
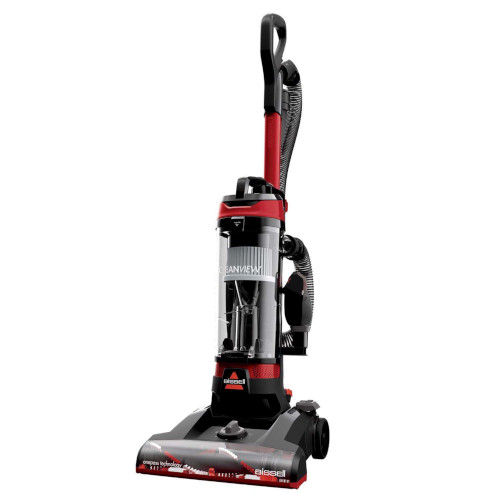
Allpoints 1421643 Bissell Bagless Vacuum Cleaner 9595
Description
Dimensions:
- Weight: 19.48 lbs
- Length: 31.5 in
- Height: 10 in
- Width: 14.5 in
| Manufacturer Name: AllPoints Product Number: 1421643 OEM Part Number: 1421643 Product Description: Bissell Bagless Vacuum Cleaner (9595) Similar Models:NONE Dimensions: Length:31.5in/80.01cm Width:14.5in/36.83cm Height:10in/25.4cm Weight:19.48lbs/8835.97g |
Choose the best Commercial kitchen & Restaurant equipment parts and supplies from PartsFe!
Same Day Shipping
Best Quality And Best Price
Wide Range of Inventory
Best Customer Service
Have More Questions or Need Help to Place The Order?
Reach us at 866-863-0907 or contact@partsfe.com
Step1: Unbox all components and ensure vacuum is unplugged during setup.
Step2: Attach handle firmly until it clicks into place.
Step3: Install dust cup and ensure filter is seated correctly.
Step4: Connect hose and cleaning attachments securely.
Step5: Plug into grounded outlet and test suction briefly.
Step6: Check dust container is empty and all parts locked before use.
-
What maintenance is required for the Allpoints 1421643 Bissell Bagless Vacuum Cleaner?
Regularly empty dustbin and clean or replace filters to maintain suction. Inspect brush roll for hair and debris and clean it often. Check hoses and air pathways for blockages to ensure proper airflow.
-
What are common issues with the Allpoints 1421643 Bissell Bagless Vacuum Cleaner?
- reduced suction due to clogged filters.
- brush roll hair tangling causing poor pickup.
- belt wear or breakage leading to brush failure.
- hose blockages restricting airflow passage.
- motor overheating resulting in automatic shutoffs.
- dust container not sealing properly causing leakage.
Customer Reviews
Write a Review
-
Sparkling Clean
Good for quick cleanups, decent suction power
We strive to provide our customers with a hassle-free and efficient shopping experience. Our shipping policy ensures the timely delivery of your orders and complete customer satisfaction. View More
We are committed to ensuring your complete satisfaction with every purchase. We understand that circumstances may arise where you must return a product or request a refund. If for any reason you are not satisfied, you may return the item(s) according to the terms outlined below. View More
This Payment Policy outlines the terms and conditions governing all payments made for products purchased through our website. By making a purchase, you agree to be bound by this Payment Policy. View More