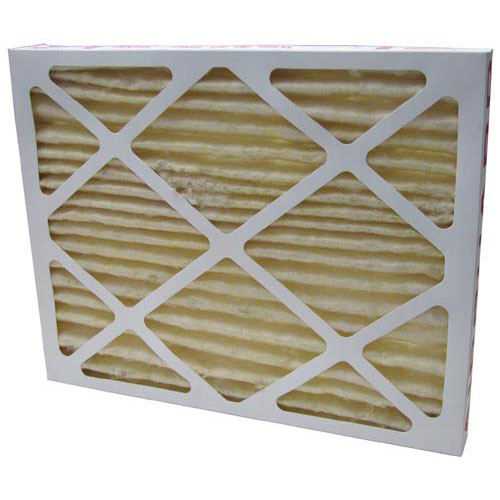

Wells 22618 Pre-Filter Hood Universal 16" X 20" X 2"
Description
The Wells 22618 Pre-Filter Hood serves as an air quality improvement system that traps grease smoke and particulates before they enter the main filtration system thus increasing system efficiency. The durable building materials guarantee dependable operation in hot kitchen areas which reduces both maintenance requirements and fire risks. The universal pre-filter features dimensions of 16" x 20" x 2" nominal size and supports multiple fryer models like WV-2HFG, WV-4HF, WV-4HS and others. This pre filter provides commercial kitchens with better airflow and reduced energy expenses and enhanced safety standards which makes it an essential compliance tool for ventilation regulations.
Dimensions:
- Weight: 3 lbs
Filtration Performance:
Captures larger airborne particles as air passes through the filter media, reducing the amount of grease, smoke, and dust that reaches downstream filtration stages. This staged filtration helps limit contaminant accumulation and supports effective air movement through the ventilation system.
Grease and Particle Filtration:
Captures grease, smoke, and airborne particulates from the cooking exhaust stream before the air reaches downstream filtration components. This pre-filtration stage helps reduce the contaminant load entering the primary filtration system.
Replacement Guidelines:
Replace the Universal Pre-Filter if it is damaged, torn, clogged, deformed, saturated, or no longer provides effective pre-filtration. The part number 22618 and filter size 16" x 20" x 2" should be verified before replacement to ensure the correct pre-filter is selected. Replace the pre-filter if deterioration affects airflow, filtration, fit, or normal hood operation.
Common Failure Symptoms:
- Filter media appears clogged or heavily loaded with contaminants.
- Visible tearing or physical damage.
- Filter is deformed or no longer maintains its intended shape.
- Airflow through the filtration stage is reduced.
- Filter no longer fits properly within its designated application.
Equipment Compatibility:
The Wells 22618Universal Pre-Filter is intended for equipment that specifies this pre-filter configuration. Verify the equipment model, filter dimensions, and manufacturer's parts documentation before purchasing to help confirm the correct application. Wells documentation lists this pre-filter for compatible ventless hood systems and configurations.
Technical Specifications:
Brand: Wells
Part Number: 22618
Component Name: Universal Pre-Filter
MERV Rating: MERV-8
BLOOMFIELD:
STERO:
STA2I-302579 STA2I302579 STA5N-22618 STA5N22618 WEL2I-302579 WEL2I302579
Step1: Turn off the ventilation system before installation.
Step2: Locate the hood filter slot and remove the old pre-filter.
Step3: Clean the filter track to remove grease and debris buildup.
Step4: Insert the new pre-filter into the slot with proper orientation.
Step5: Ensure it sits evenly without gaps or misalignment.
Step6: Turn the system back on and verify proper airflow through the hood.
-
Can the Wells Pre-Filter be used in residential kitchens?
Yes, the Wells Pre-Filter can be used in both commercial and residential kitchens with compatible fryer hood models. It provides the same benefits of improved air quality and reduced odors for home cooking environments.
-
Can the Wells Pre-Filter be cleaned and reused?
The Wells Pre-Filter is generally designed for one-time use. Cleaning and reusing the filter may affect its filtration efficiency and performance. It's recommended to replace the filter when it becomes visibly soiled or after the recommended usage period.
-
Is installation of the pre-filter difficult?
No, installation is typically straightforward. The pre-filter is designed to be easily installed within the existing filter housing of your fryer hood. However, it's advisable to refer to the product manual or guidelines for proper installation steps.
-
What maintenance is required for the Wells 22618 Pre-Filter Hood Universal?
Clean or replace the pre-filter regularly to prevent grease and debris buildup that reduces airflow. Inspect the frame and seals for damage to ensure proper fit and filtration. Follow manufacturer cleaning guidelines and use safe handling practices when removing accumulated grease.
-
What are common issues with the Wells 22618 Pre-Filter Hood Universal?
- Reduced airflow due to clogged filters.
- Dust or debris bypassing the filter.
- Filter frame warping or damage.
- Loose or improper installation affecting performance.
-
What maintenance is required for the Wells 22618 Pre-Filter Hood?
Regularly check for grease buildup or debris restricting airflow. Clean the hood surface and filter area thoroughly. Verify that the hood is securely mounted and properly aligned to maintain consistent ventilation and prevent uneven airflow through the filtration system.
-
What are common issues with the Wells 22618 Pre-Filter Hood?
- Airflow is restricted due to the buildup.
- Filter not seating correctly.
- Excess grease accumulation.
- Uneven filtration across the surface.
-
What does the Wells 22618 Universal Pre-Filter do?
The Wells 22618 Universal Pre-Filter captures airborne particles from the airstream before the air reaches the downstream filtration or equipment components.
-
Why is the Wells 22618 used as a pre-filter?
A pre-filter provides an initial stage of particle capture, helping reduce the amount of airborne material reaching subsequent filtration stages.
-
What does MERV-8 indicate on the Wells 22618 filter?
MERV-8 identifies the filter's classification for its ability to capture certain airborne particles within the applicable filtration testing range.
-
How does the Wells 22618 fit into an air filtration system?
The Wells 22618 is positioned as an initial filtration stage, where it intercepts airborne particles before air continues through the rest of the system.
-
What does the "Universal Pre-Filter" designation mean?
The "Universal Pre-Filter" designation indicates that the Wells 22618 is intended as a general pre-filtration component for applicable air-handling or ventilation equipment.
Customer Reviews
Write a Review
-
Grease Controlled
It fit right into the slot and immediately started catching grease better.
-
Easy to Install
Replacement part restored proper airflow and reduced filter maintenance.
-
Does the job
This pre-filter does an excellent job of capturing grease and particles, preventing them from spreading throughout the kitchen.
-
Dust Eliminator
Great quality, easy to install, effective filter
-
Satisfied
I'm extremely satisfied with this product. It's an essential addition to any kitchen with a fryer. It has saved me time and hassle.
We strive to provide our customers with a hassle-free and efficient shopping experience. Our shipping policy ensures the timely delivery of your orders and complete customer satisfaction. View More
We are committed to ensuring your complete satisfaction with every purchase. We understand that circumstances may arise where you must return a product or request a refund. If for any reason you are not satisfied, you may return the item(s) according to the terms outlined below. View More
This Payment Policy outlines the terms and conditions governing all payments made for products purchased through our website. By making a purchase, you agree to be bound by this Payment Policy. View More