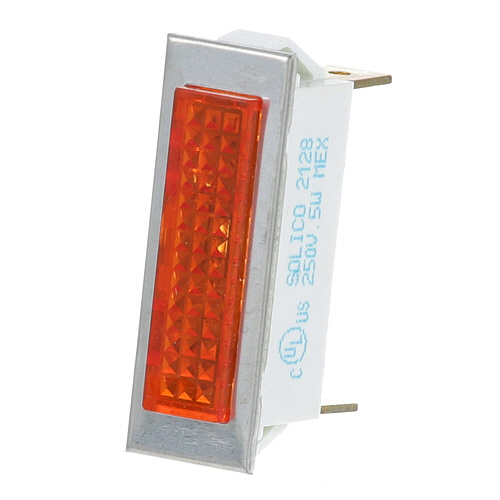
Southbend 1166491 Range Signal Light Amber 3/8" X 1-5/16" 250V
Specifications:
- Signal Light
- 250 V [ Fits Hole 3/8" X 1-5/16" ] [ 1/4" Tabs ] [Color
- Amber] [ Type Hat Flat ][ Bezel Chrome] [ Fastener Lock
- Tabs]
- Cleveland Skillet Set-10, Sel, Sem
- Southbend
Description
Dimensions:
- Weight: 0.1 lbs
- Length: 1.38 in
- Height: 1 in
- Width: 0.5 in
ACCUTEMP:
CROWN STEAM:
GROEN:
MIDDLEBY MARSHALL:
SOUTHBEND:
STAR MFG:
STERO:
TOA1433B8701
Step1: Disconnect power to the equipment and check zero voltage before starting installation.
Step2: Mount the signal light into the panel opening and secure it with the bezel nut.
Step3: Connect the indicator leads to the proper control circuit terminals, matching polarity if required.
Step4: Tighten all connections and ensure wiring is insulated and routed away from heat or moving parts.
Step5: Restore power and test the signal light for proper illumination; follow safety standards during operation.
-
hat maintenance is required for the Southbend 1166491 Signal Light?
Clean the lens regularly to maintain clear visibility. Inspect wiring connections for looseness or corrosion. Ensure the mounting remains secure under heat and vibration. Replace damaged components promptly to maintain accurate indicator performance.
-
What are common issues with the Southbend 1166491 Signal Light?
- Flickering or inconsistent illumination.
- Burned-out lamp or LED failure.
- Loose or corroded electrical terminals.
- Heat damage causing lens discoloration.
- Moisture ingress into housing.
- Faulty wiring leading to intermittent operation.
Customer Reviews
No reviews yet. Be the first to write one!
Write a Review
We strive to provide our customers with a hassle-free and efficient shopping experience. Our shipping policy ensures the timely delivery of your orders and complete customer satisfaction. View More
We are committed to ensuring your complete satisfaction with every purchase. We understand that circumstances may arise where you must return a product or request a refund. If for any reason you are not satisfied, you may return the item(s) according to the terms outlined below. View More
This Payment Policy outlines the terms and conditions governing all payments made for products purchased through our website. By making a purchase, you agree to be bound by this Payment Policy. View More