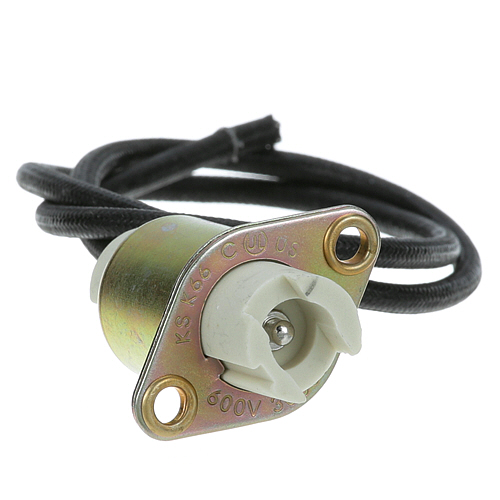

Vulcan Hart 00-825098 Cheese Melter Heater Socket 7/8" DIA 16" Wire
Description
Dimensions:
- Weight: 0.23 lbs
Electrical Connection:
Maintains the electrical contact between the heating circuit and the heating element. The socket provides a defined connection point through which electrical current can reach the element when the control system activates the heating circuit. Consistent contact helps prevent interruptions in power delivery and supports stable operation of the heating assembly.
Heat-Cycle Support:
Works as part of the heating circuit during repeated heating and cooling cycles. As the temperature control system switches the heating circuit according to operating requirements, the socket maintains the electrical connection needed for the heating element to respond to those control commands.
Replacement Guidelines:
Replace the Heater Socket if it is cracked, burned, melted, damaged, loose, or no longer provides a secure electrical connection. The part number 00-825098 should be verified before replacement to ensure the correct heater socket is selected. Replace the socket if deterioration affects electrical continuity, connection security, heat resistance, or normal equipment operation.
Common Failure Symptoms:
- Intermittent heating operation.
- Reduced or inconsistent heat output
- Heating element failing to energize consistently.
- Difficulty maintaining the required cooking temperature.
- Visible discoloration or heat damage around the socket.
- Loose or deteriorated electrical contact.
Equipment Compatibility:
Verify that VULCAN HART part number 00-825098 matches the equipment documentation before purchasing. Confirm the applicable cheese melter configuration, heater socket specifications, and manufacturer parts information.
Technical Specifications:
Brand: Vulcan Hart
Part Number: 00-825098
Component Name: Heater Socket
APW WYOTT:
-3100801 31008-01 3100801 APW31008-01 AS-3100801
CLEVELAND:
-108210 108210
LANG:
-2E-31602-01 -31602-01 200409 2E-31602-01 31602-01 LG200409 LG31602-01
LINCOLN:
-000672SP 000672SP
STAR MFG:
-200409 -2E-200409 -2E-31602-01 200409 2E-200409 2E-31602-01 5950 Z4472
STERO:
STAZ4472
VULCAN HART:
-00-825098 -30001 -825098 -825818 00-2509800 2509800 30001 825098 825818 VH00-2509800 VH00-825098 VH2509800 VH825098
Step1: Turn off the appliance and disconnect electrical power.
Step2: Remove the panel where the old socket is mounted.
Step3: Disconnect wiring from the existing socket carefully.
Step4: Insert the new socket into the 7/8" panel hole and secure it.
Step5: Connect the wires to the new socket according to specifications.
Step6: Reassemble the panel, restore power, and test the snap-in element for proper operation.
-
What maintenance is required for the Vulcan Hart 00-825098 Socket?
Regularly inspect the socket for corrosion, loose connections, or frayed wiring. Clean contacts with a dry cloth to ensure proper electrical conductivity. Avoid exposure to moisture and excessive heat. Tighten mounting hardware and replace damaged wires promptly to prevent malfunctions.
-
What are common issues with the Vulcan Hart 00-825098 Socket?
- Loose or poor electrical connections.
- Corroded or burned contacts.
- Socket cracking or breaking under stress.
- Wiring fraying or detachment affecting performance.
-
What does the Vulcan Hart 00-825098 heater socket connect to?
It provides the electrical connection between the equipment's heating circuit and the connected heating element.
-
How does the heater socket support heating operation?
It maintains the electrical path needed for power to reach the heating element when the temperature control system activates the heating circuit.
-
How should the Vulcan Hart 00-825098 Heater Socket be maintained?
Inspect the heater socket regularly for loose connections, heat damage, cracking, corrosion, or worn contacts, and follow the manufacturer's service procedures to help maintain a secure electrical connection and reliable heater operation.
-
What can cause a heater socket to deteriorate?
Repeated heating cycles, electrical loading, loose connections, excessive heat, and physical wear can contribute to contact deterioration over time.
-
What are signs of a damaged heater socket?
Intermittent heating, reduced heat output, visible discoloration, damaged contacts, loose connections, or failure of the heating element to energize consistently can indicate a socket problem.
Customer Reviews
Write a Review
-
Element Connected
Element was loose in the panel earlier. New socket held the snap-in element tightly.
-
Fits Perfectly
Fits Perfectly, highly recommend
-
Very Satisfied
This socket is perfect for snap-in elements. It's easy to install and fits securely. This diameter is perfect for my panel hole. Great quality!
We strive to provide our customers with a hassle-free and efficient shopping experience. Our shipping policy ensures the timely delivery of your orders and complete customer satisfaction. View More
We are committed to ensuring your complete satisfaction with every purchase. We understand that circumstances may arise where you must return a product or request a refund. If for any reason you are not satisfied, you may return the item(s) according to the terms outlined below. View More
This Payment Policy outlines the terms and conditions governing all payments made for products purchased through our website. By making a purchase, you agree to be bound by this Payment Policy. View More