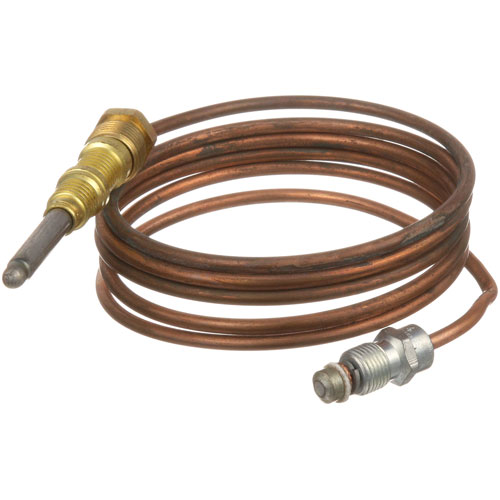
Southbend 1182565 Griddle Thermocouple 48''
Specifications:
- 1900 Series Heavy Duty Thermocouple 48" Long.20-30 Mv
- Coaxial Thermocouple Threads = 11/32"-32
- Market Forge Skillet Where Applicable
- Southbend Hdg-(36, 36M, 36Re, 48, 48M, 48Re, 60, 60M, 60Re,
- 72, 72M, 72Re)
- Vulcan Hart Heavy Duty Range/Oven Gh3/72, Gh3/72C, Gh3/72S,
- Gh30, Gh30C,
- Gh45, Gh45/72, Gh56, Gh56S, Gh6, Gh60, Gh60/45, Gh60/72,
- Gh6045C, Gh60T, Gh60T/45, Gh60T/72, Gh6C, Gh6S, Gh6T45C,
- Gh72, Gh72/45, Ghm3/72, Ghm30, Ghm30C, Ghm45, Ghm45/72,
- Ghm56, Ghm6, Ghm60, Ghm60/45, Ghm60/72, Ghm60T, Ghm60T/45,
- Ghm60T/72, Ghm72, Ghm72/45
Description
Dimensions:
- Weight: 0.3 lbs
- Length: 3 in
- Height: 1 in
- Width: 2.5 in
HOBART:
00-412788-00002 00-412788-00004 00-906955-00048 412788-00002 412788-00004 412788-2 412788-4 906955-00048 906955-48 HOB00-412788-00002 HOB00-412788-00004 HOB00-906955-00048 HOB412788-00002 HOB412788-00004 HOB412788-2 HOB412788-4 HOB906955-00048 HOB906955-48
MARKET FORGE:
-10-4758 10-4758 MAR10-4758
SOUTHBEND:
-1182565 SOU1182565
U-LINE:
VULCAN HART:
-00-412788-00002 -00-412788-00004 -00-906955-00048 00-412788-00002 00-412788-00004 00-412788-00048 00-906955-00048 412788-00002 412788-00004 412788-00048 412788-2 412788-4 412788-48 906955-00048 906955-48 VH00-412788-00002 VH00-412788-00004 VH00-412788-00048 VH412788-00002 VH412788-00004 VH412788-00048 VH412788-2 VH412788-4 VH412788-48 VH906955-00048
Step1: Shut off gas and electrical power, then allow the appliance to cool completely before starting work.
Step2: Remove burner access panel and disconnect the existing thermocouple from the gas control valve.
Step3: Route the new thermocouple along the original path, ensuring the tip sits securely in the pilot flame area.
Step4: Tighten all connections to the valve and secure mounting hardware without over-torquing fittings.
Step5: Restore gas supply, relight pilot, and check stable flame along with proper safety shutdown response.
-
What maintenance is required for the Southbend 1182565 Thermocouple?
Inspect the thermocouple regularly for soot, corrosion, or loose threaded connections. Clean the sensing tip to maintain accurate flame detection and millivolt output. Ensure proper placement in the pilot flame. Always shut off the gas supply before servicing to avoid leaks.
-
What are common issues with the Southbend 1182565 Thermocouple?
- Weak or fluctuating millivolt signal output.
- Improper positioning in pilot flame.
- Damaged or worn threaded connections.
- Residue or corrosion affecting sensing accuracy.
Customer Reviews
No reviews yet. Be the first to write one!
Write a Review
We strive to provide our customers with a hassle-free and efficient shopping experience. Our shipping policy ensures the timely delivery of your orders and complete customer satisfaction. View More
We are committed to ensuring your complete satisfaction with every purchase. We understand that circumstances may arise where you must return a product or request a refund. If for any reason you are not satisfied, you may return the item(s) according to the terms outlined below. View More
This Payment Policy outlines the terms and conditions governing all payments made for products purchased through our website. By making a purchase, you agree to be bound by this Payment Policy. View More