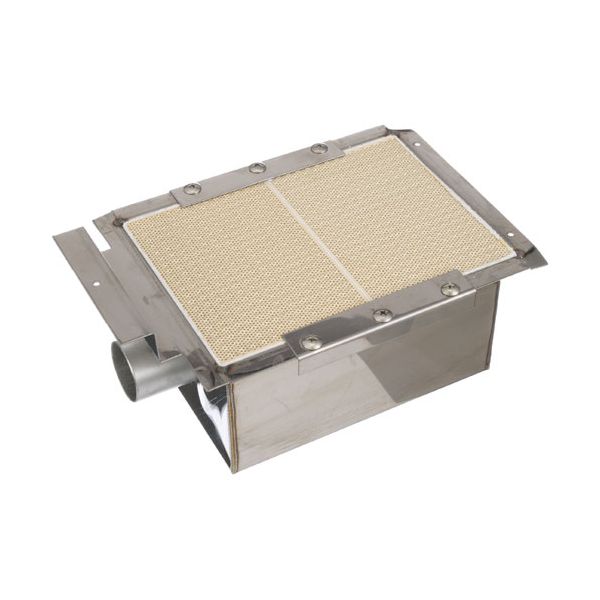
Southbend 1183246 Range IR Burner 10" X 6-5/8" X 4-3/4"

Special Price $431.86 Regular Price $974.01
In stock
SKU
1183246
The Southbend 1183246 Range IR Burner Assembly works by releasing infrared heat via the burner surface when gas is ignited and this creates a uniform and controlled heating source. This works to make high-intensity radiant energy focused on food items to make them melt, brown, or finish quickly. The assembly is generally installed in the area of commercial ranges which is placed above the cooking area to provide localized heat to specific culinary uses.

Dimensions

  • Length: 10 In
  • Width: 7 In
  • Height: 5 In
  • Weight: 2.92 lbs
https://partsfe.com/media/catalog/product/s/o/southbend-1183246-range-ir-burner-10-x-6-5-8-x-4-3-4-76677-2.jpg

Product Notes

  • Overall Dimensions = 10" X 6-5/8" X 4-3/4", Ceramic Area =
  • 7-3/8" X 5-1/4"
  • Southbend/Lang Cheesemelter Lgr24-Cm, Lgr36-Cm, Lgr36-Nfr,
  • Lgr36-Rad, Lgr48-Cm, Lgr48-Nfr, Lgr48-Rad, Lgr60-Cm,
  • Lgr72-Cm,
  • Broiler P32-Cm, P32-Cm-Pt, P32-Nfr, P32-Rad, P36-Cm,
  • P36-Cm-Pt, P36-Nfr, P36-Rad, P48-Cm, P48-Cm-Pt, P48-Nfr,
  • P48-Rad, P60-Cm, P60-Cm-Pt, P72-Cm, P72-Cm-Pt
Produces concentrated infrared radiant heat for overhead cooking applications such as melting, browning, and finishing food. The Southbend 1183246 Cheese Melter Infrared Burner Assembly uses gas combustion to generate thermal energy at the burner surface and directs radiant heat toward the cooking area. Its 10" × 6-5/8" × 4-3/4" configuration defines the physical arrangement of the assembly within the heating system. Stable burner operation helps provide consistent thermal exposure across the designated cooking area during normal equipment operation.

Heat Distribution:
Directs radiant energy toward the designated cooking area to provide controlled heat exposure. Proper burner positioning helps maintain the intended relationship between the heat source and cooking surface, supporting consistent melting, browning, and finishing results.

Burner Assembly Structure:
Combines the burner components required to produce and direct radiant heat within the appliance. The assembly must maintain its intended physical shape and position so that combustion and heat distribution occur correctly during operation.

Replacement Guidelines:
Replace the Cheese Melter Infrared Burner Assembly if it is cracked, damaged, deformed, burned, or no longer produces the required infrared heat output. Verify part number 1183246 before replacement to ensure you select the correct infrared burner assembly. Replace the burner assembly if deterioration affects heat generation, burner integrity, installation fit, or normal cheese melter operation.

Common Failure Symptoms:

  • Cracks or chips on the burner surface.
  • Warped or distorted burner assembly.
  • Broken or damaged burner components.
  • Deteriorated burner surface.
  • Missing sections from the burner face.
  • Improper burner positioning.
  • Uneven heat exposure during operation.

Equipment Compatibility:
The SOUTHBEND 1183246 Cheese Melter Infrared Burner Assembly is intended for equipment that specifies part number 1183246. Verify part number 1183246 against the existing burner assembly and confirm the applicable cheese melter or broiler model using the equipment parts diagram, owner's manual, or manufacturer's documentation. Southbend documentation identifies 1183246 as an assembly burner for infrared cheesemelter equipment.

Technical Specifications:
Brand: Southbend
Part Number: 1183246
Product Name: Infrared Burner Assembly
Appliance Type: Cheese Melter
Dimensions: 10" X 6-5/8" X 4-3/4"

SOUTHBEND:
Write Your Own Review
You're reviewing:Southbend 1183246 Range IR Burner 10" X 6-5/8" X 4-3/4"
Your Rating
Customer Questions
What is the Best Electric Griddle?

Electric Griddle is an electronic equipment that uses an electric element as its heat source. It has a large cooking surface often made up of nonstick material. Electric Griddle has a surface which you do not find in the regular stovetop cookware. ...

What maintenance is required for the Southbend 1183246 IR Burner?

Clean the IR burner regularly to remove grease and food debris, which can affect heat distribution. Inspect the infrared surface for cracks or blockages. Ensure the burner is cool before handling and verify proper electrical connections for safe operation.

What are the common issues with the Southbend 1183246 IR Burner?

  • Uneven or weak heat output
  • Cracks or warping of the burner surface
  • Electrical connection failures
  • Burn marks or buildup affecting performance.

What is the Southbend 1183246 cheese melter burner assembly used for?

The Southbend 1183246 is the burner assembly used to provide heat within a compatible cheese melter for melting and finishing food.

What does "infrared burner" mean on the Southbend 1183246?

An infrared burner produces radiant heat that transfers energy toward the food and cooking area during cheese melter operation.

Why is the burner supplied as an assembly?

A burner assembly groups the burner components required for the heating section of the cheese melter, making the assembly the relevant replacement unit when the complete burner section requires replacement.

We strive to provide our customers with a hassle-free and efficient shopping experience. Our shipping policy ensures the timely delivery of your orders and complete customer satisfaction. View More

We are committed to ensuring your complete satisfaction with every purchase. We understand that circumstances may arise where you must return a product or request a refund. If for any reason you are not satisfied, you may return the item(s) according to the terms outlined below. View More

This Payment Policy outlines the terms and conditions governing all payments made for products purchased through our website. By making a purchase, you agree to be bound by this Payment Policy. View More

Installation Steps

Step1: Turn off the gas supply and disconnect the range from power.

Step2: Remove the old burner by loosening mounting screws and disconnecting gas lines.

Step3: Clean the burner cavity and surrounding area.

Step4: Place the new burner into position, aligning mounting holes.

Step5: Secure the burner with screws and reconnect gas lines.

Step6: Restore power and slowly turn on the gas, checking for leaks.

Step7: Test ignition and ensure even heat distribution before regular use.