Imperial 1166 Blower Wheel W/2 Set Screws CCW 8-1/16" DIA X 2-1/2" W X 1/2" Hole

Special Price $62.37 Regular Price $99.00
In stock
SKU
1166
Manufacturer:
The Imperial 1166 Blower W⁠heel W/2 Set Scr⁠ews C‍CW 8-1/16" DIA x 2-1/2" W x 1⁠/​2" Hole is​ an air move‌ment compon‍ent use​d​ in c⁠ommercial cooking and ve‌nt⁠ilation‌ equipme‍nt to c‌ircula‍te a‌irfl‍ow wi​t⁠hin‌ the appliance system. Designed‍ with‍ a counterclock‍wise rotatio‍n pattern, t‍h⁠e blower wheel mounts onto a m‍otor⁠ shaft using two set screws and operate‍s as⁠ part o⁠f‌ the bl⁠ow‍er a​ssembly in ovens, ranges, and hea‍ting equ​ip‍ment us‍ed in res​tauran‌ts and​ commercail kitc⁠he⁠n⁠s. During operation,‍ it draws an‌d di‍rects​ air through the ventilation or comb‌ustion chamber to su​pport⁠ heat distribution and airflow management.​

Dimensions

  • Length: 8.167 In
  • Width: 8.167 In
  • Height: 2.5 In
  • Weight: 1.9 lbs
https://partsfe.com/media/catalog/product/i/m/imperial-1166-ccw-rotation-blower-wheel-w-2-set-screws-8-1-16-dia-x-2-1-2-w-x-1-2-hole-34256.jpg

Product Notes

  • Blower Wheel
  • 8-1/16" Dia X 2-1/2" W X 1/2" Hole, Flat Back,
  • Ccw Rotation, Smooth Hub, 2 Set Screws.
  • American Range Ar-C
  • Oven Model?
  • Imperial Oven Series: Icv, Icvd, Ir W/Convection Oven.
  • Vulcan Oven Gh W/Convection Oven
  • Wolf Oven All Commander & Challenger Snorkler Units W/Conv
  • Oven.

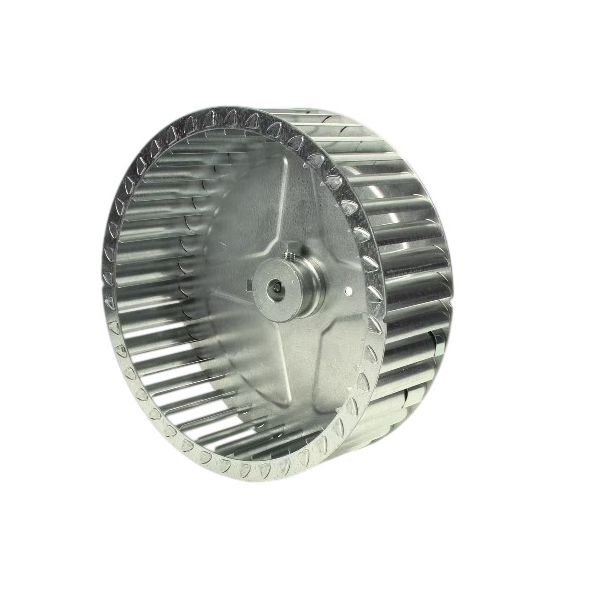
An oven fan impeller manages proper internal hot air distribution inside commercial baking equipment by physically accelerating and moving heated air currents through the cooking chamber. Operating with a counter-clockwise (CCW) blade orientation, this squirrel-cage styled impeller pulls stale air from the cavity center and forces it across the heat exchangers or burner tubes to maintain uniform multi-rack cooking. Built with a 1/2-inch center shaft bore hole, a smooth hub profile, and a flat back mounting disc, it fits onto standard high-temperature convection motor spindles where it is locked into place using two integrated set screws. Accumulated grease vapor, carbon buildup, and thermal fatigue can warp the individual blades or cause the blower hub to loosen, leading to vibrating motor sounds, rattling noises, or severe temperature stratification between oven racks. Swapping out a distorted or off-balance wheel effectively resolves these performance failures, eliminating the localized cold pockets that result in unevenly baked goods or prolonged cooking times. This precise 8-1/16 inch diameter by 2-1/2 inch width component is commonly used throughout the foodservice sector inside full-size commercial gas ranges, counter convection systems, and specialized snorkel-style baking lines to protect heating components and secure consistent product turnouts.

Equipment Compatibility:
Air circulation and thermal balancing configurations for Imperial Blower Wheels include commercial gas convection ovens, multi-rack restaurant ranges, heavy-duty production ovens, and specialized snorkel baking lines. This Blower Wheel 1166 is compatible with commercial equipment from leading brands such as American Range, Imperial, Vulcan Hart, Wolf, Royal Range, and Hobart, where high-velocity air movement is required for reliable operation.

Brand Compatibility:
This blower wheel replaces various compatible parts used across commercial kitchen equipment brands such as American Range, Hobart, Imperial, Royal Range, Tri-Star, Vulcan Hart, and more. Full cross-reference details are available separately for accurate matching.

Product Specifications:
Product Type: Blower Wheel
Manufacturer: Imperial
SKU: 1166
Outer Diameter: 8-1/16"
Width: 2-1/2"
Bore Size: 1/2"
Rotation Direction: CCW
Hub Type: Smooth hub
Backing Style: Flat back
Mounting: 2 set screws

Key Features:

  • CCW (counter-clockwise) blade design promotes even hot air circulation for consistent baking results.
  • 8-1/16" diameter and 2-1/2" width ensure proper fit in compatible convection oven housings.
  • 1/2" bore with dual set-screw mounting provides secure attachment to motor shaft.
  • Squirrel-cage impeller design improves airflow efficiency and heat distribution.
  • Flat back construction reduces turbulence and supports smooth internal air movement.
  • Helps eliminate hot and cold spots for more uniform multi-rack cooking performance.

Installation Feedback:

"Often mentions that more even heat circulation and improved baking consistency across racks after replacing the blower wheel."

Write Your Own Review
You're reviewing:Imperial 1166 Blower Wheel W/2 Set Screws CCW 8-1/16" DIA X 2-1/2" W X 1/2" Hole
Your Rating
Customer Questions
What maintenance is required for the Imperial 1166 Blower Wheel?

Inspect the blower wheel regularly for dust, debris, and bent or damaged blades. Clean with a soft brush or compressed air, and ensure it spins freely without wobbling. Tighten mounting screws and follow safety precautions by powering off equipment before servicing.

What are the common issues with the Imperial 1166 Blower Wheel?

  • Reduced airflow due to debris buildup.
  • Vibration from bent or misaligned blades.
  • Noise from loose or worn bearings.
  • Imbalance causing operational inefficiency.

We strive to provide our customers with a hassle-free and efficient shopping experience. Our shipping policy ensures the timely delivery of your orders and complete customer satisfaction. View More

We are committed to ensuring your complete satisfaction with every purchase. We understand that circumstances may arise where you must return a product or request a refund. If for any reason you are not satisfied, you may return the item(s) according to the terms outlined below. View More

This Payment Policy outlines the terms and conditions governing all payments made for products purchased through our website. By making a purchase, you agree to be bound by this Payment Policy. View More

Installation Steps

Step1: Turn off the power supply to the appliance completely.

Step2: Access the blower housing inside the unit.

Step3: Remove the old blower wheel from the shaft.

Step4: Install the new wheel onto the motor shaft.

Step5: Tighten set screws securely in place.

Step6: Ensure proper alignment and clearance.

Step7: Restore power and test airflow performance.