
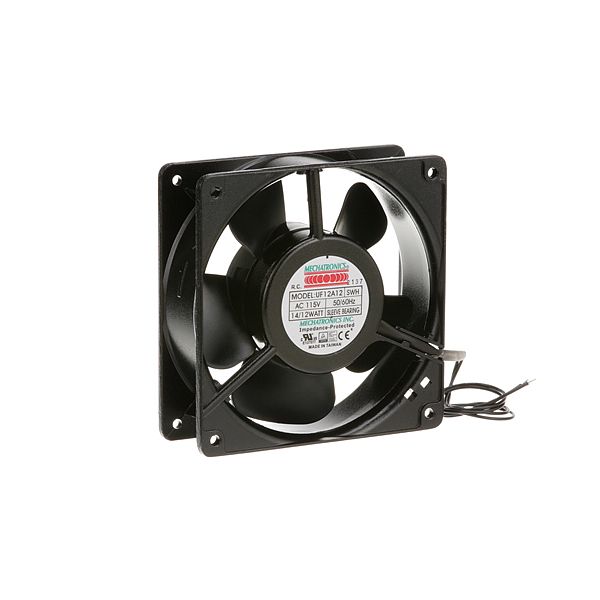
Hobart 424940-00001 Axial Fan W/ 12" Wire Leads 4-1/8" DIA 106 CFM

Special Price $140.28 Regular Price $253.00
In stock
SKU
424940-00001
Manufacturer:

The Hobart 424940-00001 Axial Fan with 12 inches wire leads and a 4-1/8 inches diameter delivers a high airflow of 106 CFM, it adequately facilitates the flow of air in order to regulate temperature so as to avoid overheating. This fan was designed to run without any excessive noise and its proper cooling capability prolongs the durability of the equipment. Designed for stoves, refrigerators and many other appliances, it helps to save energy due to enhanced circulation of air. This structure guarantees the product’s performance in conditions that are challenging for other parts, which makes it indispensable for effective operation of the kitchen.

Dimensions

  • Length: 5 In
  • Width: 5 In
  • Height: 1.5 In
  • Weight: 1.3 lbs
https://partsfe.com/media/catalog/product/h/o/hobart-424940-00001-axial-fan-w-12-wire-leads-4-1-8-dia-106-cfm-52087-2.jpg

Product Notes

  • Axial Fan, 4-1/8" Sq Mt Ctrs, X 1-1/2" Wide, 120V, Cw,
  • 12" Wire Leads, 106 Cfm,
  • Alto-Shaam Asc-4G
  • Vul424940-1 Oem Is Mechatronics
  • Vulcan Oven Sg4C, Sg4D, Sg6C, Sg6D, Vc4Gs, Vc4Gd, Vc4Ec,
  • Vc4Ed, Vc4Es, Vc6Gs, Vc6Gd, Vc6Ec, Vc6Ed, Vc6Es,
  • Vc4Es, Vc6Gs, Vc6Gd, Vc6Ec, Vc6Ed, Vc6Es,
  • Vc4Es, Vc6Gs, Vc6Gd, Vc6Ec, Vc6Ed, Vc6Es,
Write Your Own Review
You're reviewing:Hobart 424940-00001 Axial Fan W/ 12" Wire Leads 4-1/8" DIA 106 CFM
Your Rating
Customer Questions
What maintenance is required for the Hobart 424940-00001 Axial Fan?

Clean the fan blades and housing to remove dust or grease. Check electrical connections and secure mounting. Inspect for bent blades or imbalance. Proper maintenance ensures consistent airflow and prevents noise or motor pressure.

What are common issues with the Hobart 424940-00001 Axial Fan?

  • Bent or damaged fan blades reducing efficiency.
  • Imbalanced rotation causing vibration and noise.
  • Electrical connection failures leading to intermittent operation.
  • Debris buildup restricting airflow.
  • Corrosion weakening the structure over time.
  • Motor overload from blocked airflow.
  • Reduced cooling or ventilation performance affecting connected systems.

We strive to provide our customers with a hassle-free and efficient shopping experience. Our shipping policy ensures the timely delivery of your orders and complete customer satisfaction. View More

We are committed to ensuring your complete satisfaction with every purchase. We understand that circumstances may arise where you must return a product or request a refund. If for any reason you are not satisfied, you may return the item(s) according to the terms outlined below. View More

This Payment Policy outlines the terms and conditions governing all payments made for products purchased through our website. By making a purchase, you agree to be bound by this Payment Policy. View More

Installation Steps

Step1: Unplug the unit before starting installation.

Step2: Remove the fan guard or panel covering the existing fan.

Step3: Disconnect the old fan from its wiring and mounting points.

Step4: Position the new fan in the same orientation as the original.

Step5: Reconnect wires and secure screws or clips as needed.

Step6: Replace the panel or guard, ensuring it’s firmly attached.

Step7: Power on the unit and check airflow and noise levels.