
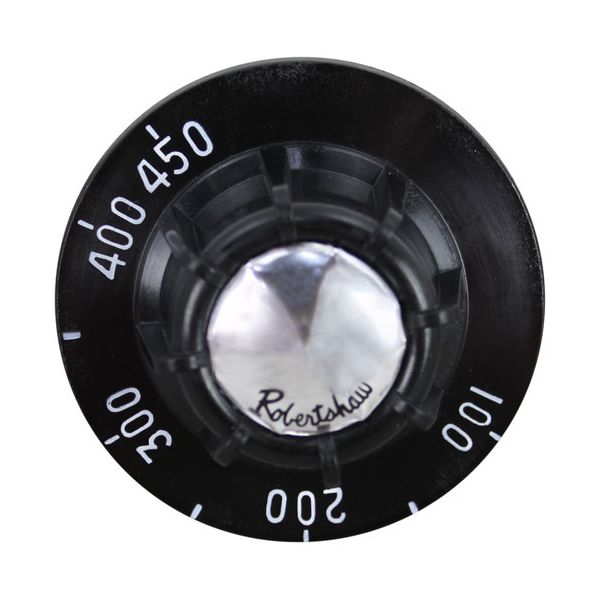
Vulcan Hart 00-413617-00001 Range Thermostat Dial 2-1/2"D 100°F-450°F

$44.63
In stock
SKU
00-413617-00001
Manufacturer:

The Vulcan Hart 00-413617-00001 Range Thermostat Dial 2-1/2"D 100°F-450°F operates by rotating the dial to adjust the temperature settings to the desired value by moving the internal control to the desired value. It works by connecting to the thermostat mechanism such that the controlled temperature range varies with the change in position. This dial is attached to the front control panel of the appliance in such a way that the markings are aligned with the control shaft in order to be able to select the correct setting. Its size and scale can be integrated with the existing thermostat system.

Dimensions

  • Length: 2.5 In
  • Width: 2.5 In
  • Height: 1.125 In
  • Weight: 0.06 lbs
https://partsfe.com/media/catalog/product/v/u/vulcan-hart-00-413617-00001-dial-2-1-2-d-100-450-37794-2.jpg

Product Notes

  • Fd T'Stat Knob, Griddle
  • [ 2-1/2" Dia ] [ 100-450] [Mount .290"]
  • For Griddle Thermostat Kit # 46-1075
  • Vulcan Oven/Griddle Gh60, Gh60/72, Gh60T, Gh60T/72, Ghm60,
  • Ghm60/72, Ghm60T, Ghm60T/72, Ghx60, Ghx60T, Ghxm60, Ghxm60T
  • Wells Hot Plate H006, H33, H65, H336
Write Your Own Review
You're reviewing:Vulcan Hart 00-413617-00001 Range Thermostat Dial 2-1/2"D 100°F-450°F
Your Rating
Customer Questions
What maintenance is required for the Vulcan Hart 00-413617-00001 Dial?

Keep the dial clean and free from grease or food debris by wiping with a damp cloth regularly. Inspect markings and ensure smooth rotation to maintain accuracy. Proper support prevents calibration errors and ensures temperature control in cooking equipment.

What are common issues with the Vulcan Hart 00-413617-00001 Dial?

  • Faded or worn dial markings causing inaccurate readings.
  • Stiff or loose rotation affecting control accuracy.
  • Misalignment with control shaft leading to improper setting.
  • Cracking or breakage of dial face under heat exposure.

We strive to provide our customers with a hassle-free and efficient shopping experience. Our shipping policy ensures the timely delivery of your orders and complete customer satisfaction. View More

We are committed to ensuring your complete satisfaction with every purchase. We understand that circumstances may arise where you must return a product or request a refund. If for any reason you are not satisfied, you may return the item(s) according to the terms outlined below. View More

This Payment Policy outlines the terms and conditions governing all payments made for products purchased through our website. By making a purchase, you agree to be bound by this Payment Policy. View More

Installation Steps

Step1: Disconnect power or gas supply to the equipment before servicing for safety.

Step2: Pull the old dial straight off the control shaft or loosen retaining hardware if equipped.

Step3: Inspect the thermostat stem for damage, grease buildup, or looseness before installation.

Step4: Align the new dial with the shaft flat and press firmly into place.

Step5: Verify smooth rotation through temperature settings and confirm accurate alignment with indicator markings.

Step6: Restore power and test temperature control operation.