Cleveland FK103726 Steamer Dual Float Assembly

Special Price $218.16 Regular Price $462.20
In stock
SKU
FK103726
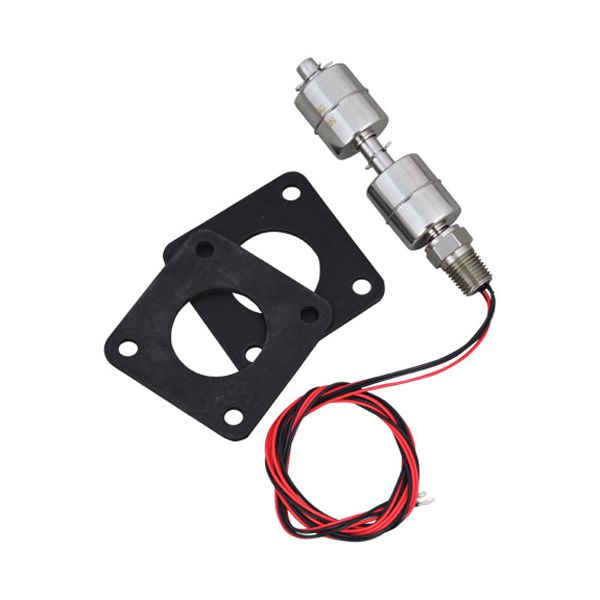
Cleveland FK103726 Float Switch Kit is used to sense the level of liquid by way of a light float that is either up or down with the fluid in the tank. The float has an internal switch which opens or closes the electrical circuit as the float moves to indicate filling or shutoff requirements. This installed in the reservoir or water chamber and is placed in such a way that it can directly observe the fluid height and relay the level change to the system when the system is operating normally.

Dimensions

  • Length: 4.5 In
  • Width: 1.5 In
  • Height: 4.5 In
  • Weight: 0.1 lbs
https://partsfe.com/media/catalog/product/c/l/cleveland-fk103726-steamer-dual-float-assembly-57312-2.jpg

Product Notes

  • Dual Float Switch
  • With Threaded Fitting At 12 O'Clock Upper Float Witness
  • Mark "O" Faces Down And Lower Float Witness Mark Faces
  • Up. Upper Switch (Red Wires) Is N/C, Lower Switch (Black
  • Wires) Is N/O.
  • Includes Qty 2 Gasket # 321341
  • Cleveland Steamer 21-Cet-8, 21-Cet-16, Ca-1E
CLEVELAND:
103726, 2093400, CLE103726, CLE2093400, FK103726
GARLAND:
Write Your Own Review
You're reviewing:Cleveland FK103726 Steamer Dual Float Assembly
Your Rating
Customer Questions
What maintenance is required for the Cleveland FK103726 Steamer Dual Float Assembly?

Regularly inspect and clean the float assembly to remove scale and debris. Ensure floats move freely and seals remain intact to maintain accurate steam level control. Preventive maintenance reduces malfunctions and supports safe, efficient steamer operation.

What are common issues with the Cleveland FK103726 Steamer Dual Float Assembly?

  • Clogging from mineral scale affecting float movement.
  • Inaccurate water level readings causing operational inconsistency.
  • Worn or sticking float mechanism leading to erratic control.
  • Faulty seals resulting in steam leakage issues.

We strive to provide our customers with a hassle-free and efficient shopping experience. Our shipping policy ensures the timely delivery of your orders and complete customer satisfaction. View More

We are committed to ensuring your complete satisfaction with every purchase. We understand that circumstances may arise where you must return a product or request a refund. If for any reason you are not satisfied, you may return the item(s) according to the terms outlined below. View More

This Payment Policy outlines the terms and conditions governing all payments made for products purchased through our website. By making a purchase, you agree to be bound by this Payment Policy. View More

Installation Steps

Step1: Turn off appliance supply power, and allow system to cool completely.

Step2: Open access panel and carefully remove old float assembly from housing.

Step3: Align new float assembly with mounting bracket and secure fasteners tightly.

Step4: Reconnect wiring, ensure float moves freely without obstruction or binding in chamber.

Step5: Restore power, test system operation, check for leaks, and verify proper float function.