
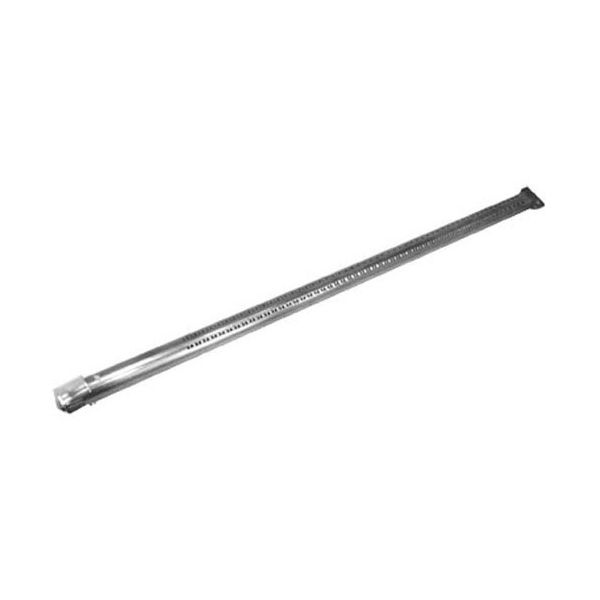
Montague MON20486-2 Steel Burner Tube 25-1/4" OD X 1" DIA, 18-3/4" Burn Area

Special Price $80.23 Regular Price $194.25
In stock
SKU
MON20486-2
Manufacturer:
Montague MON20486-2 Steel-Burner Tube is used in charbroilers to distribute heat uniformly and for proper cooking. It has an outer diameter of 25-1/4 inch and an inner diameter of 1 inch with a heating area of 18-3/4 inch which is suitable for grilling. This burner tube is intended for use on Montague charbroilers and is constructed to provide long-lasting and effective service. It has an air shutter (#26-1863) to control the flow of air for combustion and flame stability. It is made of high steel which gives it the ability to retain heat for a longer time and also the longevity of the equipment is also increased.

Dimensions

  • Length: 25.25 In
  • Width: 1.5 In
  • Height: 1.5 In
  • Weight: 0.8 lbs
https://partsfe.com/media/catalog/product/m/o/montague-mon20486-2-steel-burner-tube-25-1-4-od-x-1-dia-18-3-4-burn-area-92293.jpg

Product Notes

  • Steel Burner Tube,
  • [ 25-1/4" Od X 1" Dia. ] 18-3/4" Burn Area, Steel,
  • Air Shutter - # 26-1863,
  • Montague Charbroiler
Write Your Own Review
You're reviewing:Montague MON20486-2 Steel Burner Tube 25-1/4" OD X 1" DIA, 18-3/4" Burn Area
Your Rating
Customer Questions
What is the Best Electric Griddle?

Electric Griddle is an electronic equipment that uses an electric element as its heat source. It has a large cooking surface often made up of nonstick material. Electric Griddle has a surface which you do not find in the regular stovetop cookware. ...

What maintenance is required for the Montague MON20486-2 Steel Burner Tube?

Regularly inspect burner tube for carbon buildup and blockages, and clean with a soft brush to maintain proper gas flow. Check alignment and connections to ensure consistent flame distribution. Replace worn components promptly to prevent uneven heating and ignition issues.

What are common issues with the Montague MON20486-2 Steel Burner Tube?

  • Carbon buildup inside burner tube leading to reduced efficiency.
  • Uneven flame distribution across burn area.
  • Gas flow restriction causing weak heating.
  • Ignition delays or failure to ignite.
  • Hotspots causing inconsistent burner performance.

We strive to provide our customers with a hassle-free and efficient shopping experience. Our shipping policy ensures the timely delivery of your orders and complete customer satisfaction. View More

We are committed to ensuring your complete satisfaction with every purchase. We understand that circumstances may arise where you must return a product or request a refund. If for any reason you are not satisfied, you may return the item(s) according to the terms outlined below. View More

This Payment Policy outlines the terms and conditions governing all payments made for products purchased through our website. By making a purchase, you agree to be bound by this Payment Policy. View More

Installation Steps

Step1: Turn off gas supply and ensure unit is cool before starting.

Step2: Remove existing burner tube and clean mounting surface thoroughly.

Step3: Align new burner tube with manifold and secure using hardware.

Step4: Reconnect gas line and test for leaks using soapy water solution.

Step5: Restore gas supply, ignite burner, and verify stable flame operation.

Step6: Wear gloves and ensure proper ventilation during installation area.