Pitco 60130901 Fryer Pilot Burner NAT/LP W/Electrode

Special Price $159.39 Regular Price $307.00
In stock
SKU
60130901
Manufacturer:
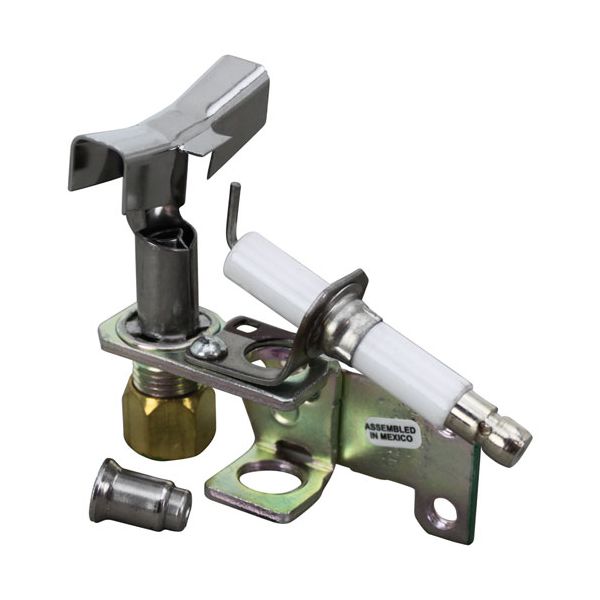
The Pitco 60130901 Pilot Burner/Ignitor Assembly is a natural gas part that supplies the ignition source that is required to start the pilot flame to maintain a better operation of the burner and even heat in the fryer system. This assembly is often used in restaurants and food supply kitchens and it is installed into the gas line of the fryer and the ignition. It is designed with high accuracy to aid the ignition, and this adds to the safety and effectiveness of fryers in demanding cooking conditions.

Dimensions

  • Length: 2.75 In
  • Width: 3.875 In
  • Height: 1.625 In
  • Weight: 0.15 lbs
https://partsfe.com/media/catalog/product/p/i/pitco-60130901-fryer-pilot-burner-nat-lp-w-electrode-87549-2.jpg

Product Notes

  • Pilot Assembly, W/Electrode Igniter, Nat/Lp.
  • Lp Orifice Only = Ap# 261556
  • Pitco Fryer Sg, Sgh50
Write Your Own Review
You're reviewing:Pitco 60130901 Fryer Pilot Burner NAT/LP W/Electrode
Your Rating
Customer Questions
What is the Best Electric Griddle?

Electric Griddle is an electronic equipment that uses an electric element as its heat source. It has a large cooking surface often made up of nonstick material. Electric Griddle has a surface which you do not find in the regular stovetop cookware. ...

What maintenance is required for the Pitco 60130901 Pilot Burner?

Regularly clean the pilot burner and electrode to remove carbon buildup and debris. Inspect gas connections for leaks and ensure proper flame ignition. Keep the orifice clear for consistent performance and safe operation.

What are common issues with the Pitco 60130901 Pilot Burner?

  • Weak or unstable pilot flame due to clogged or partially blocked orifice.
  • Electrode not sparking causing ignition failure or intermittent start.
  • Gas flow irregularities leading to delayed startup or inconsistent heating.
  • Carbon buildup affecting flame detection and sensor response.

We strive to provide our customers with a hassle-free and efficient shopping experience. Our shipping policy ensures the timely delivery of your orders and complete customer satisfaction. View More

We are committed to ensuring your complete satisfaction with every purchase. We understand that circumstances may arise where you must return a product or request a refund. If for any reason you are not satisfied, you may return the item(s) according to the terms outlined below. View More

This Payment Policy outlines the terms and conditions governing all payments made for products purchased through our website. By making a purchase, you agree to be bound by this Payment Policy. View More

Installation Steps

Step1: Turn off gas supply and electrical power; allow fryer to cool completely before servicing.

Step2: Remove existing pilot burner assembly carefully using proper tools.

Step3: Mount new pilot burner in position and secure bracket tightly.

Step4: Connect gas line and electrode wire ensuring tight correct fittings.

Step5: Adjust electrode gap near burner tip for proper ignition.

Step6: Restore gas supply check for leaks using soapy water solution.

Step7: Ignite pilot burner and confirm stable steady flame operation.