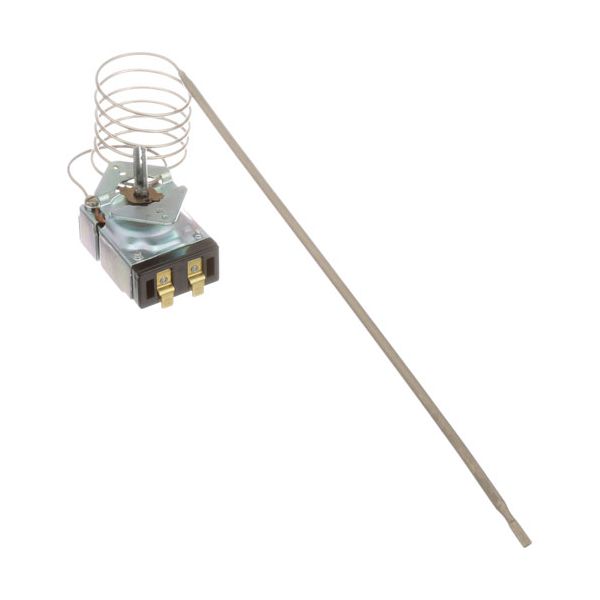
Blodgett 5279 Oven KX Thermostat 3/16" X 11-5/8" Bulb 36" cap

Special Price $108.04 Regular Price $212.94
In stock
SKU
5279
The Blodgett 5279 Thermostat 3/16 x 11-5/8, 36-inch cap, KX-38-36 is a replacement part that fits commercial ovens which controls and keeps the internal temperature of the oven and makes sure that the heating process in cooking is consistent and accurate. The thermostat is connected to the control system and measures the temperature variation and turns the burner or heating element on or off. This thermostat is frequently used in the kitchens of restaurants, and other food service settings and it the accurate control of temperature, better cooking outcomes and efficiency of the work.

Dimensions

  • Length: 12.25 In
  • Width: 2.25 In
  • Height: 2.5 In
  • Weight: 0.5 lbs
https://partsfe.com/media/catalog/product/b/l/blodgett-5279-oven-kx-thermostat-3-16-x-11-5-8-bulb-36-cap-98847-2.jpg

Product Notes

  • [Kx ][ Temp 140-550 F ] [ Bulb 3/16" X 11-5/8" ]
  • [Cap 36"] [.187" ]
  • Some Models Use # 22-1216 Dial (11224)Off-550-200
  • # 22-1065 Dial (16393) Off-500-200.
  • Later Models After Sep '86 Use Knob With Pointer # 22-1106
  • Blodgett Oven 1200 Pizza Ovens, Ef/Eze, Re.
  • Oven Ctb & Ctbr (Prior To 9-15-86), Dfg (Prior To 7-1-87),
  • Mark V (Prior To 9-1-86), Mark V (Prior To 9-1-86),
  • Series:Zephaire E & G W/Mech Controls,Sh1G, Series: Sho.
  • Garland Oven Series: 680 (Elec).
Write Your Own Review
You're reviewing:Blodgett 5279 Oven KX Thermostat 3/16" X 11-5/8" Bulb 36" cap
Your Rating
Customer Questions
What maintenance is required for the Blodgett 5279 Thermostat?

Inspect the thermostat bulb and capillary tube regularly for kinks, cracks, or oil leaks that can affect temperature accuracy. Keep the sensing bulb clean and properly positioned inside the oven cavity. Ensure electrical connections remain tight and free from corrosion. Always disconnect power before servicing to avoid electrical hazards.

What are common issues with the Blodgett 5279 Thermostat?

  • Inaccurate temperature control due to calibration drift.
  • Capillary tube damage or leaks cause failure.
  • Thermostat not responding or sticking contacts.
  • Uneven oven heating from sensor malfunction.
  • Intermittent heating cycles caused by faulty thermostat switching.

We strive to provide our customers with a hassle-free and efficient shopping experience. Our shipping policy ensures the timely delivery of your orders and complete customer satisfaction. View More

We are committed to ensuring your complete satisfaction with every purchase. We understand that circumstances may arise where you must return a product or request a refund. If for any reason you are not satisfied, you may return the item(s) according to the terms outlined below. View More

This Payment Policy outlines the terms and conditions governing all payments made for products purchased through our website. By making a purchase, you agree to be bound by this Payment Policy. View More

Installation Steps

Step1: Disconnect oven from power or gas supply and allow it to fully cool before starting.

Step2: Remove the control panel cover to access the existing thermostat and capillary tube assembly.

Step3: Carefully detach the old thermostat and pull out the capillary without bending or kinking it.

Step4: Install the new thermostat in the same position and route capillary securely.

Step5: Reassemble panel, restore power, and test temperature calibration for proper operation.