Hobart 00-328247 Dishwasher Dual Scale Pressure Gauge 0-100 PSI 2-1/2"

Special Price $22.39 Regular Price $38.00
In stock
SKU
00-328247
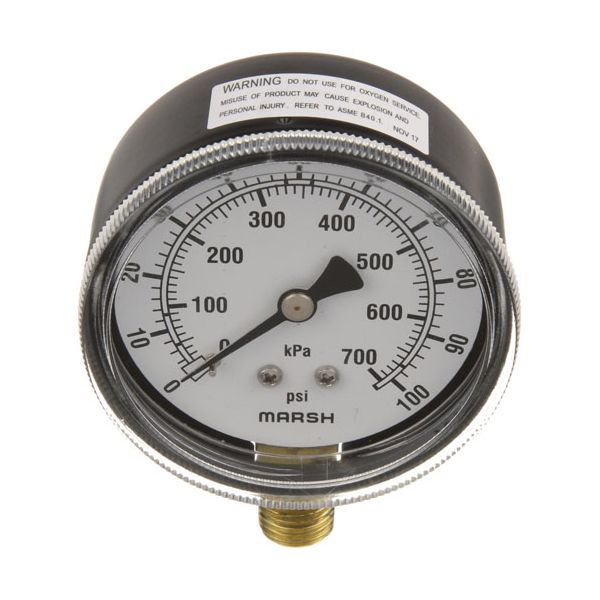
The Hobart 00-328247 Dishwasher Dual Scale Pressure Gauge 2-1/2″ Dual Scale W/0-100 PSI measures the pressure in the internal system by applying the force of fluid or gas through the bottom connection into the sensing mechanism of the gauge that moves an internal pointer. This pointer is used to indicate readings on a dual-scale dial, which indicates two units of measurement at the same time. It is attached to an appropriate port on compatible commercial kitchens or equipment systems where direct monitoring of pressure is required.

Dimensions

  • Length: 3.5 In
  • Width: 3 In
  • Height: 1.3 In
  • Weight: 0.3 lbs
https://partsfe.com/media/catalog/product/h/o/hobart-00-328247-2-1-2-dual-scale-pressure-gauge-1-4-mpt-bottom-81571-2.jpg

Product Notes

  • Dual Scale Pressure Gauge
  • Size 2-1/2" Dia [Range 0-100 Psi / 0-700 Kpa ],
  • Mount 1/4" Mpt Bottom
  • Champion Dishwasher
  • Cleveland Steamer Convection Steamer:9-Pcdm-L,9-Pcem-48-L,
  • 9-Pcgm-250-L, 9-Pcgm-300-L, 9-Pcsm-L.
  • Hobart Dishwasher Am, C.
  • Jackson Diswasher 10Ab, 10Aprb, 44Ce, 44Rpw, 100B, 100Prb,
  • 150B, 150Prb
  • Vulcan Dishwasher 3D, A, Cd, Cu16, R16.
  • Toastmaster Dishwasher Tkm-27.
More Information
Disable SaleableNo
CHAMPION:
CLEVELAND:
GENERAL ELECTRIC:
MIDDLEBY MARSHALL:
STAR MFG:
Write Your Own Review
You're reviewing:Hobart 00-328247 Dishwasher Dual Scale Pressure Gauge 0-100 PSI 2-1/2"
Your Rating
Customer Questions
What maintenance is required for the Hobart 00-328247 Pressure Gauge?

Inspect the gauge for cracks, leaks, or corrosion. Verify proper calibration periodically. Keep connections tight and free of debris. Maintenance ensures accurate pressure readings and prevents overpressure damage to connected systems.

What are common issues with the Hobart 00-328247 Pressure Gauge?

  • Inaccurate readings from calibration drift.
  • Leaks around connections or seals.
  • Cracked or fogged gauge face reduces visibility.
  • Corrosion damaging internal components.
  • Needle sticking or fluctuating under stable pressure.
  • Vibration affects reading stability.

We strive to provide our customers with a hassle-free and efficient shopping experience. Our shipping policy ensures the timely delivery of your orders and complete customer satisfaction. View More

We are committed to ensuring your complete satisfaction with every purchase. We understand that circumstances may arise where you must return a product or request a refund. If for any reason you are not satisfied, you may return the item(s) according to the terms outlined below. View More

This Payment Policy outlines the terms and conditions governing all payments made for products purchased through our website. By making a purchase, you agree to be bound by this Payment Policy. View More

Installation Steps

Step1: Ensure system is depressurized and powered off before installation.

Step2: Remove the old gauge from the threaded connection carefully.

Step3: Apply thread sealant to the new gauge if required.

Step4: Screw in the new gauge to the bottom connection securely.

Step5: Ensure gauge orientation allows easy reading.

Step6: Restore system pressure slowly and check for leaks.

Step7: Verify readings to ensure the gauge is functioning properly.