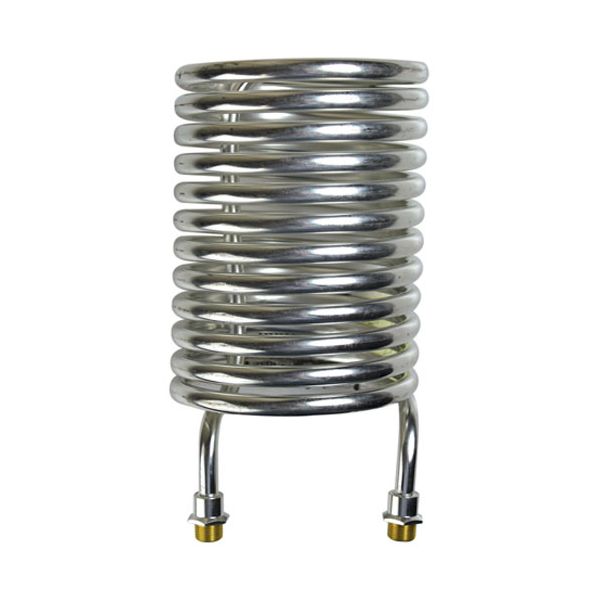
Bunn 12689-1000 Hot Water Coil Kit

Special Price $94.00 Regular Price $178.40
In stock
SKU
12689-1000
The Bunn 12689-1000 Hot Water Coil Kit is a replacement heating element designed to be used in other compatible beverage equipment. It conducts heat to water when passing through the coil, allowing the appliance to reach and sustain proper brewing or dispensing temperatures. This coil is used in commercial beverage service in the heating tank assembly, where constant temperature regulation is required. Its role in the system assists in providing a supply of hot water that facilitates the machine cycles without a significant change in thermal conditions that may result in unstable operation.

Dimensions

  • Length: 9.5 In
  • Width: 4.375 In
  • Height: 9 In
  • Weight: 2 lbs
https://partsfe.com/media/catalog/product/b/u/bunn-12689-1000-hot-water-coil-kit-43018-2.jpg

Product Notes

  • Tank Hot Water Coil Kit, Nickel Plated.
  • 4.92" Dia. Od
  • Coil Body 6-1/2" Long
  • Overall Length 9"
  • Fittings Threaded Inside & Out. 1/8" Fpt Id, 9/16"-24 Od.
  • Bunn C, Combo Brewer, Crtf5, Ct, Ctf, Cwaps, Cwaps-Mv, Cwt,
  • Cwt Twin, Cwt-Aps, Cwt-Cs, Cwtf, Cwtf Twin, Cwtf-Aps,
  • Cwtf-Cs, Cwtf-Mv, Cwtf-Tc, Cwtf-Twin, Cwtfa, Cwts, Cwts-Mv,
  • Cwtsr, Cwtsr-Mv, Gmb-Ps, Ot, Rt, Single Cw, Single Cwtf,
  • Tnt-3, Tntf-3, Tw, Twf, Twf-15, Twf-Ez, Twin-Aps, Twin-Tc
Write Your Own Review
You're reviewing:Bunn 12689-1000 Hot Water Coil Kit
Your Rating
Customer Questions
What maintenance is required for the Bunn 12689-1000 Hot Water Coil Kit?

Regularly inspect the hot water coil for mineral scale, corrosion, or leaks that can reduce heating efficiency and water flow. Check fittings and connections for tightness and signs of wear. Always disconnect power and allow the unit to cool before performing maintenance.

What are common issues with the Bunn 12689-1000 Hot Water Coil Kit?

  • Reduced water heating caused by heavy scaling.
  • Dripping or leakage at connection joints.
  • Slow or restricted water movement through the coil.
  • Gradual loss of heating consistency.

We strive to provide our customers with a hassle-free and efficient shopping experience. Our shipping policy ensures the timely delivery of your orders and complete customer satisfaction. View More

We are committed to ensuring your complete satisfaction with every purchase. We understand that circumstances may arise where you must return a product or request a refund. If for any reason you are not satisfied, you may return the item(s) according to the terms outlined below. View More

This Payment Policy outlines the terms and conditions governing all payments made for products purchased through our website. By making a purchase, you agree to be bound by this Payment Policy. View More

Installation Steps

Step1: Disconnect power and allow the unit to cool completely.

Step2: Turn off water supply and drain residual water.

Step3: Open the machine housing to access the existing coil.

Step4: Carefully disconnect fittings and remove the old coil.

Step5: Install the new coil, securing all connections tightly.

Step6: Reassemble the unit and restore water supply.

Step7: Power on and check for leaks or faults.