
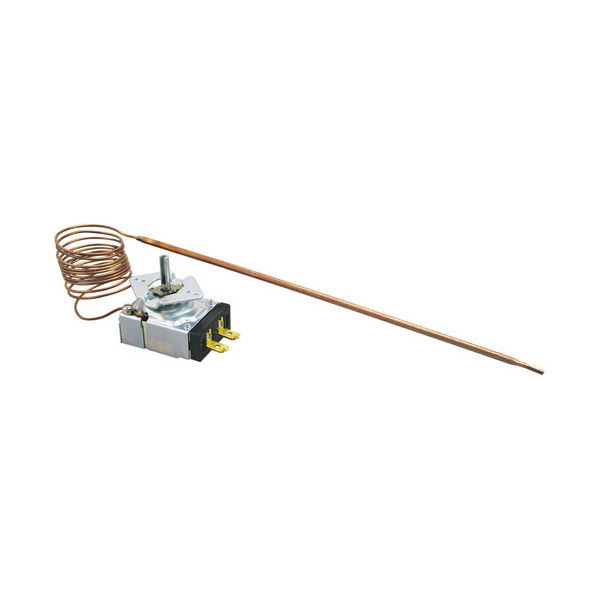
Hobart 411506-00003 KX Thermostat W/pointer Knob 3/16" X 11-5/8"

Special Price $93.87 Regular Price $144.64
In stock
SKU
411506-00003
The Hobart 411506-00003 KX Thermostat With Pointer Knob 3/16" X 11-5/8" controls the internal temperatures using a liquid-filled capillary tube, which expands or contracts to open or close electrical contacts. This mechanical movement keeps certain levels of thermal conditions in the equipment by switching the heating elements depending on the place of the built-in 3/16" x 11-5/8" sensor bulb. It is mounted directly into the operating housing of any compatible commercial food service appliance, and the part is integrated on the exterior interface so that it can be manually adjusted.

Dimensions

  • Length: 12.5 In
  • Width: 2.75 In
  • Height: 2.5 In
  • Weight: 0.5 lbs
https://partsfe.com/media/catalog/product/h/o/hobart-411506-00003-kx-thermostat-w-pointer-knob-dial-3-16-x-11-5-8-bulb-60-cap-175-500-temp-1-mount-76826-2.jpg

Product Notes

  • [ Type- Kx ] [ Temp 175-500 ] [ Bulb 3/16" X 11-5/8" ]
  • [ Cap 60" ] [ Mount 1 ] .187" D-Stem Flat Down,
  • For Pointer Knob Use # 22-1107. Or
  • [ Dial , # 22-1007 Off-550-200 4-Way Blk/Silver &
  • [Bezel # 26-1227]. Or
  • [Vul Dial, # 22-1270 Off-550-200 Black Flat Down ]
  • Vulcan Grill 77 (Older Electric Range), Vs, Vtm.
  • Oven 141, 241, Rgt-10.
  • Series: Et, Gh, Ghm, Sg, Vs, Vtm, Vc4Gs Vc6Gs,
  • Vc4Es, Vc6Es.
  • Wolf Convection Oven Wkgd
Write Your Own Review
You're reviewing:Hobart 411506-00003 KX Thermostat W/pointer Knob 3/16" X 11-5/8"
Your Rating
Customer Questions
What maintenance is required for the Hobart 411506-00003 Thermostat?

Clean the dial and external components to prevent buildup that affects adjustment accuracy. Inspect the bulb and capillary for leaks or damage. Ensure secure mounting and verify calibration periodically to maintain accurate temperature control during operation.

What are common issues with the Hobart 411506-00003 Thermostat?

  • Inaccurate readings due to calibration drift.
  • Damaged or leaking sensing bulb.
  • Sticky or unresponsive dial mechanism.
  • Capillary tube kinks affecting performance.
  • Inconsistent temperature regulation output.

We strive to provide our customers with a hassle-free and efficient shopping experience. Our shipping policy ensures the timely delivery of your orders and complete customer satisfaction. View More

We are committed to ensuring your complete satisfaction with every purchase. We understand that circumstances may arise where you must return a product or request a refund. If for any reason you are not satisfied, you may return the item(s) according to the terms outlined below. View More

This Payment Policy outlines the terms and conditions governing all payments made for products purchased through our website. By making a purchase, you agree to be bound by this Payment Policy. View More

Installation Steps

Step1: Disconnect power and ensure equipment is cool before servicing.

Step2: Remove old thermostat assembly and note wiring positions.

Step3: Mount new thermostat securely in original bracket location.

Step4: Reconnect sensing bulb and route it carefully to avoid kinks.

Step5: Reattach electrical connections per wiring diagram.

Step6: Restore power, test temperature range and adjust calibration if needed.
