Hatco R02.12.001.00 Food Warmer Axial Fan W/ Lead Wire & Plug 115V

Special Price $68.03 Regular Price $113.00
In stock
SKU
R02.12.001.00
Manufacturer:
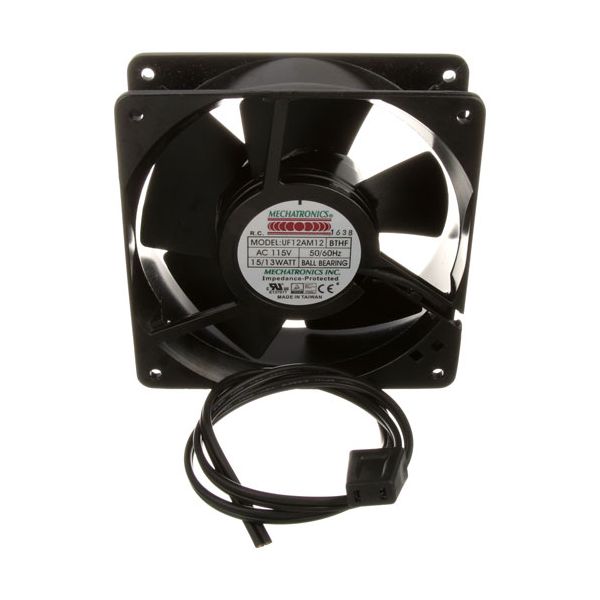
The Hatco R02.12.001.00 Axial Fan 115V 50/60Hz operates by pulling air blades in order to keep the airflow inside the system steady. It operates with a power supply of 115 volts and a 50/60 Hz frequency to facilitate constant ventilation when it is in operation. This fan is housed inside commercial foodservice appliances, such as areas that require air circulation to eliminate heat collection and ensure that the necessary conditions are achieved inside the system. Its design allows the circulation of air in the places that have warming, holding, or heating objects.

Dimensions

  • Length: 4.7 In
  • Width: 4.7 In
  • Height: 1.5 In
  • Weight: 1.7 lbs
https://partsfe.com/media/catalog/product/h/a/hatco-r02-12-001-00-food-warmer-axial-fan-w-lead-wire-plug-115v-29574.jpg

Product Notes

  • Axial Fan With Lead Wire W/Plug
  • 115V, 50/60Hz, 15/13W 4 Holes Threaded
  • Ccw Blowing Away From Hub W/Label, Blower Fan,
  • 4-1/8" Mount Ctrs X 1-1/2 Wide ,
  • For Lead Wire W/Plug Only Use # 38-1356
  • Hatco Food Warmer Fdw1 (X)
Write Your Own Review
You're reviewing:Hatco R02.12.001.00 Food Warmer Axial Fan W/ Lead Wire & Plug 115V
Your Rating
Customer Questions
What maintenance is required for the Hatco R02.12.001.00 Axial Fan?

Regularly inspect the fan blades and motor for dust buildup and debris. Clean using a soft brush or compressed air to maintain airflow and prevent overheating. Check electrical connections for damage, ensuring the lead wire and plug are secure to avoid potential hazards.

What are common issues with the Hatco R02.12.001.00 Axial Fan?

  • Fan failing to start or exhibiting intermittent operation
  • Excessive noise or vibration from worn bearings
  • Overheating due to airflow obstruction
  • Damaged or frayed wiring affecting power delivery.

We strive to provide our customers with a hassle-free and efficient shopping experience. Our shipping policy ensures the timely delivery of your orders and complete customer satisfaction. View More

We are committed to ensuring your complete satisfaction with every purchase. We understand that circumstances may arise where you must return a product or request a refund. If for any reason you are not satisfied, you may return the item(s) according to the terms outlined below. View More

This Payment Policy outlines the terms and conditions governing all payments made for products purchased through our website. By making a purchase, you agree to be bound by this Payment Policy. View More

Installation Steps

Step1: Unplug the food warmer and ensure the unit is cool before starting.

Step2: Remove the existing fan from the warmer housing using a screwdriver.

Step3: Position the new Hatco fan in place, aligning the mounting holes.

Step4: Secure the fan with screws and connect the lead wire to the plug.

Step5: Double-check all connections, then plug in and test the unit.

Step6: Avoid contact with hot surfaces and electrical components during installation.