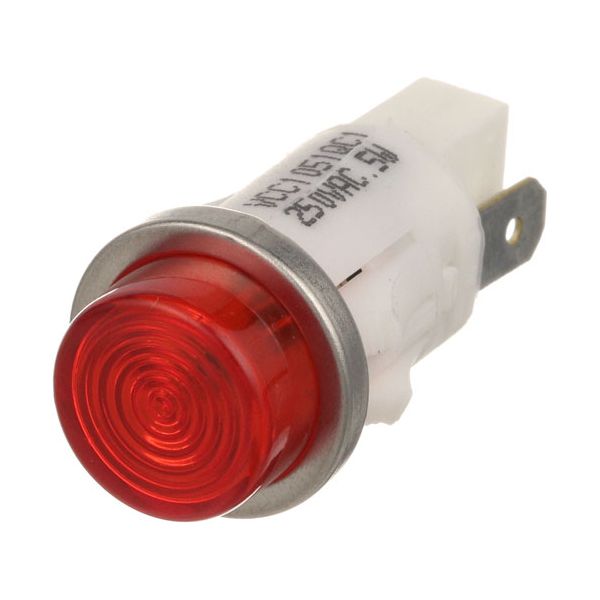
Blodgett BL90101 Signal Light 1/3W 1/2" 250V

Special Price $18.90 Regular Price $30.00
In stock
SKU
BL90101
The Blodgett BL90101 Signal Light is a commercial electrical indicator that is used to show the operational status of cooking equipment. It has a 1/3-watt rating, a 1/2-inch mounting size, and a capacity of 250 volts and is mounted on the control panel, where it ensures a clear visual indication when a circuit or an operator is on. This signal light is widely used in commercial ovens and other such appliances to direct operators on the power or heating status when using them. It serves as a component of the control and monitoring system of the equipment.

Dimensions

  • Length: 1.2 In
  • Width: 0.5 In
  • Height: 0.5 In
  • Weight: 0.1 lbs
https://partsfe.com/media/catalog/product/b/l/blodgett-bl90101-250v-1-3w-1-2-signal-light-30085-2.jpg

Product Notes

  • 250V 1/3W [ Hole 1/2"] [3/16" Tab Terminals] [Color Red]
  • Type Raised/Flat ][ Bezel Chrome] [ Fastener Lock Tabs]
  • ,Flat On Side
  • Alto-Shaam Food Warmers
  • Blodgett Oven Kco-25E, Mt2136(E & G) For Australia & The
  • Netherlands, Mt3855G, Mt3870. Series: Ctb (Cook Only)~
  • Zephaire E W/Mechaincal Controls.
  • Ge/Hobart Oven, Warmer, Fryer
  • Groen Cfpc, Fpc, Dee, Tdb, Oven 1001
  • Savory Toaster Pd-4.
  • Vulcan Grill
  • Winston Warmer Cd32T03Se1 (England & Germany).
ADCRAFT:
CROWN STEAM:
GENERAL ELECTRIC:
LINCOLN:
MARKET FORGE:
RANDELL:
EL LGT500, ELLGT500, PWSKELLGT500
ROYAL RANGE:
SAVORY:
SOUTHBEND:
Write Your Own Review
You're reviewing:Blodgett BL90101 Signal Light 1/3W 1/2" 250V
Your Rating
Customer Questions
What maintenance is required for the Blodgett BL90101 Signal Light?

Regularly inspect wiring connections and ensure the lens is clean and secure. Check for flickering or dimming during operation and replace damaged components promptly. Proper maintenance ensures accurate signaling and reduces electrical faults or overheating risks.

What are common issues with the Blodgett BL90101 Signal Light?

  • Flickering or intermittent illumination due to loose wiring.
  • Burned-out signal element from voltage fluctuations.
  • Lens discoloration reducing visibility.
  • Connection failure causing complete signal loss.
  • Overheating of housing due to continuous operation.
  • Poor contact at terminals causing erratic performance.

We strive to provide our customers with a hassle-free and efficient shopping experience. Our shipping policy ensures the timely delivery of your orders and complete customer satisfaction. View More

We are committed to ensuring your complete satisfaction with every purchase. We understand that circumstances may arise where you must return a product or request a refund. If for any reason you are not satisfied, you may return the item(s) according to the terms outlined below. View More

This Payment Policy outlines the terms and conditions governing all payments made for products purchased through our website. By making a purchase, you agree to be bound by this Payment Policy. View More

Installation Steps

Step1: Turn off power at the main circuit breaker to avoid electric shock.

Step2: Locate the mounting panel and remove the old signal light if present.

Step3: Insert the new signal light into the panel hole.

Step4: Secure it firmly using the provided nut or fastener.

Step5: Connect wires to matching terminals.

Step6: Restore power and test for proper illumination.