Middleby Marshall 46522 Oven Blower Switch Kit W/ 7/8" Fit Hole

Special Price $102.07 Regular Price $184.04
In stock
SKU
46522
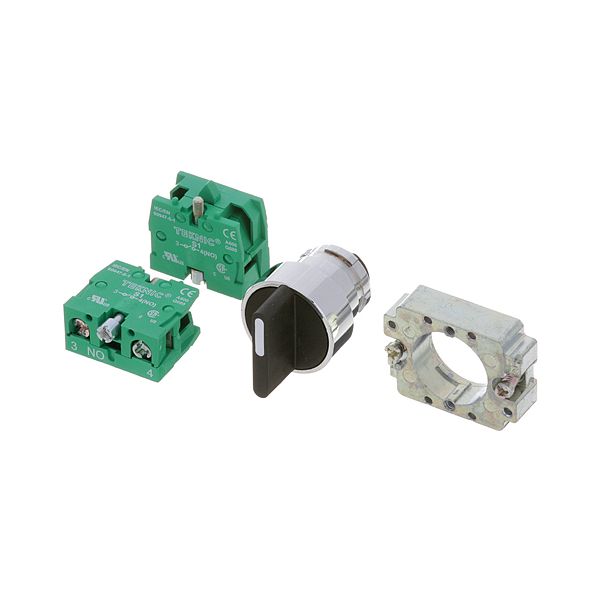
The Middleby Marshall 46522 Blower Switch Kit manages the functioning of the oven blower to control flow of air in order to have a uniform distribution of heat and uniform cooking results. It is mounted in a 7/8" panel hole in the control assembly to control the blower system when required. The switch kit is also common in restaurant kitchens and other food service settings, and is necessary in ensuring the accuracy of the oven operation, and consistency of cooking outcomes

Dimensions

  • Length: 3.25 In
  • Width: 1.75 In
  • Height: 1.75 In
  • Weight: 0.192 lbs
https://partsfe.com/media/catalog/product/m/i/middleby-marshall-46522-oven-blower-switch-kit-w-7-8-fit-hole-64762-2.jpg

Product Notes

  • Blower Switch Kit, New Style Switch & Contact Block.
  • Rotary Switch Fits 7/8" Hole, Has 2 Switches On Back.
  • Middleby Marshall Oven Js250, Ps200-R68, Ps220Fs-R68,
  • Ps224-R68, Ps250,Ps300, Ps310, Ps350, Ps360, Ps360Wb70.
  • Be2136, Be3240, Bg2136, Ps536, S1820
Write Your Own Review
You're reviewing:Middleby Marshall 46522 Oven Blower Switch Kit W/ 7/8" Fit Hole
Your Rating
Customer Questions
What maintenance is required for the Middleby Marshall 46522 Blower Switch Kit?

Inspect the oven blower switch contacts regularly for damage, corrosion, or looseness to ensure accurate operation. Keep the surrounding area clean and free from grease buildup that may affect switching performance. Verify proper electrical connections and mounting stability. Always disconnect power before servicing to ensure safety.

What are common issues with the Middleby Marshall 46522 Blower Switch Kit?

  • Switch failure leading to intermittent or no blower activation.
  • Loose or corroded electrical connections causing inconsistent performance.
  • Overheating due to electrical arcing or contact wear.
  • Mechanical fit issues in the mounting hole causing instability.

We strive to provide our customers with a hassle-free and efficient shopping experience. Our shipping policy ensures the timely delivery of your orders and complete customer satisfaction. View More

We are committed to ensuring your complete satisfaction with every purchase. We understand that circumstances may arise where you must return a product or request a refund. If for any reason you are not satisfied, you may return the item(s) according to the terms outlined below. View More

This Payment Policy outlines the terms and conditions governing all payments made for products purchased through our website. By making a purchase, you agree to be bound by this Payment Policy. View More

Installation Steps

Step1: Disconnect power supply and gas to oven and allow it to cool completely before service.

Step2: Remove control access panel to reach blower switch assembly.

Step3: Label and disconnect wiring from old switch carefully.

Step4: Install new switch into mounting position.

Step5: Reconnect wiring securely according to original configuration diagram.

Step6: Reassemble panel restore power and test blower operation for safe operation.