Blodgett 30006 Oven Gas Control NAT/LP 1/2" FPT 24V

Special Price $144.66 Regular Price $300.09
In stock
SKU
30006
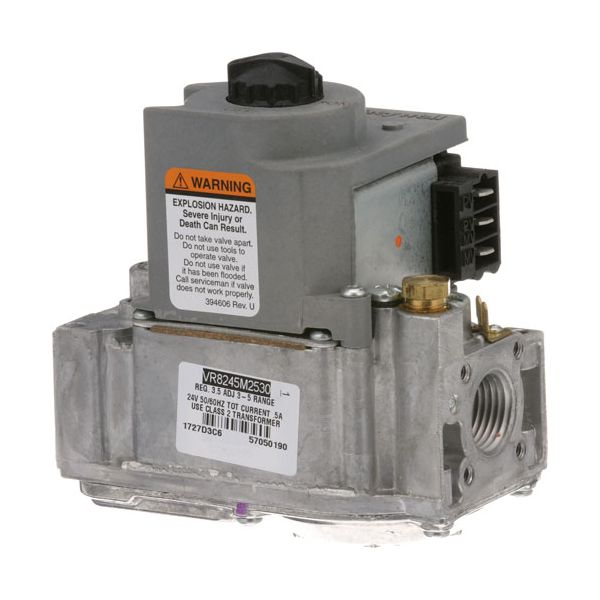
The Blodgett 30006 Gas Valve is a control component that is installed in commercial ovens that use liquid propane gas. It controls the flow of gases to the burner, which is used in the cooking cycles to maintain the ignition and control of the flames. The valve is 24 volts and is connected by a 1/2-inch female thread. It is usually fitted in the gas system assembly of the oven and is an essential in ensuring safe, and efficient combustion performance in the professional kitchen setup.

Dimensions

  • Length: 3 In
  • Width: 4.25 In
  • Height: 4 In
  • Weight: 2.275 lbs
https://partsfe.com/media/catalog/product/b/l/blodgett-30006-oven-gas-control-nat-lp-1-2-fpt-24v-67069-2.jpg

Product Notes

  • Nat/Lp, 1/2" Fpt In/Out, Pilot Out Only 3/16" Cct.
  • 150,000 Btu, 24 V.
  • *Used In # 54-1035
  • Includes Nat To Lp Conversion Kit # 51-1227
  • Blodgett B14G, Bc-20G, Bcx-(14, 14E, 14G), Bx-(14, 14E,
  • 14G), Cnvx-(14, 14E, 14G), Dfg-(50, 100, 200)
  • Oven Series: Dfg 100, 200 & 300,
  • Zephaire G Which Use 24V.
  • Marshall Air
  • Broiler Fr15Bg.
MARKET FORGE:
Write Your Own Review
You're reviewing:Blodgett 30006 Oven Gas Control NAT/LP 1/2" FPT 24V
Your Rating
Customer Questions
What is the Best Electric Griddle?

Electric Griddle is an electronic equipment that uses an electric element as its heat source. It has a large cooking surface often made up of nonstick material. Electric Griddle has a surface which you do not find in the regular stovetop cookware. ...

What maintenance is required for the Blodgett 30006 Control Valve?

Regularly inspect the Oven gas control valve for leaks, corrosion, or loose fittings. Ensure wiring connections remain secure and free from heat damage. Keep the surrounding area clean to prevent debris interference. Always shut off gas and power before servicing for safety.

What are common issues with the Blodgett 30006 Blodgett 30006 Control Valve?

  • Gas valve fails to open or close properly.
  • Inconsistent flame or burner ignition problems.
  • Electrical connection faults causing control failure.
  • Gas leakage due to worn internal seals.

We strive to provide our customers with a hassle-free and efficient shopping experience. Our shipping policy ensures the timely delivery of your orders and complete customer satisfaction. View More

We are committed to ensuring your complete satisfaction with every purchase. We understand that circumstances may arise where you must return a product or request a refund. If for any reason you are not satisfied, you may return the item(s) according to the terms outlined below. View More

This Payment Policy outlines the terms and conditions governing all payments made for products purchased through our website. By making a purchase, you agree to be bound by this Payment Policy. View More

Installation Steps

Step1: Turn off the gas supply and disconnect electrical power to the oven before starting.

Step2: Remove access panels to reach the existing gas control valve.

Step3: Disconnect gas line fittings and wiring from the old valve.

Step4: Install the new valve, ensuring correct orientation and secure fittings.

Step5: Reconnect wiring and gas lines, then check for gas leaks using a soap solution.

Step6: Restore power and gas supply, then test oven operation safely.