Groen 101542 Oven Thermostat Kit K Type Dip-Sealed 100-290°F

Special Price $115.31 Regular Price $228.59
In stock
SKU
101542
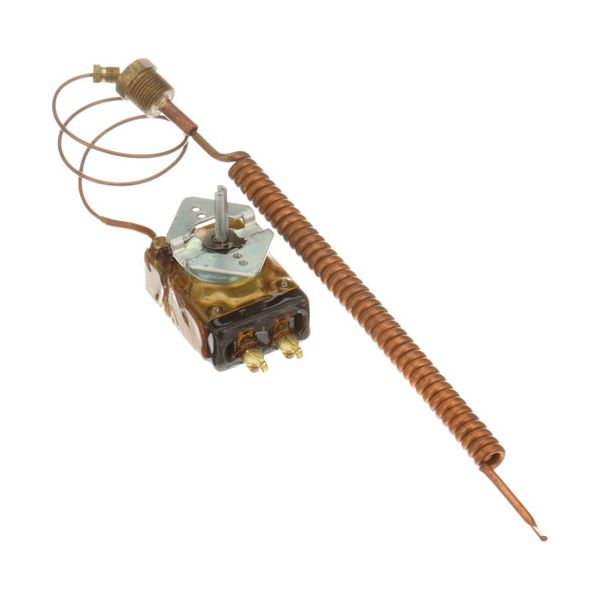
The Groen 101542 Thermostat Kit uses a K-type dip-sealed probe that works between 100°F and 290°F to keep temperatures accurate. This thermostat works better in kitchens and keeps cooking equipment at the right temperature all the time. The thermostat is built to last in hot kitchen settings. The kit has everything you need to install the thermostat, which makes fixing broken ones simple. The kit helps kitchens work better, perform well temperature, which food service professionals need to cook food correctly.

Dimensions

  • Length: 13 In
  • Width: 3 In
  • Height: 4.5 In
  • Weight: 0.65 lbs
https://partsfe.com/media/catalog/product/g/r/groen-101542-oven-thermostat-kit-k-type-dip-sealed-100-290-f-56754-2.jpg

Product Notes

  • Thermostat, K Type, Dip-Sealed
  • 100-290F, Bulb = 8" Long Coiled, 18" Cap, 3/8" Stuffing Box
  • Groen Kettle Ah-20, Ah-40, Ah-60, Ah-80, Ah/1E-100,
  • Ah/1E-40, Ah/1E-60, Ah/1E-80, Ahs-40, Ee-100, Ee-20, Ee-40,
  • Ee-60, Ee-80, Tdb-20, Tdb-40, Tdb/6, Tdb/7, Tdb/7-20,
  • Tdb/7-40, Tdbc-20, Tdbc-40, Tdh-20, Tdh-40,
  • Tdhc-20, Tdhc-40
  • Knob For Series Ah, Ee, Dee, Dh # 22-1631
  • Knob For Series Tdb, Tdh # 22-1218
Write Your Own Review
You're reviewing:Groen 101542 Oven Thermostat Kit K Type Dip-Sealed 100-290°F
Your Rating
Customer Questions
What maintenance is required for the Groen 101542 Thermostat Kit?

Inspect the thermostat for buildup, corrosion, or damage to the sensor. Clean gently with a soft cloth and ensure secure electrical connections. Disconnect power before servicing. Routine care supports maintain accurate temperature control and stable operation.

What are common issues with the Groen 101542 Thermostat Kit?

  • Temperature may overshoot or undershoot set points.
  • Heating elements may cycle incorrectly or fail to operate.
  • Loose or corroded connections at terminals.
  • Internal sensor failure is causing inaccurate readings.
  • Mechanical sticking or misalignment of the dial.
  • Delayed response leading to uneven cooking.

We strive to provide our customers with a hassle-free and efficient shopping experience. Our shipping policy ensures the timely delivery of your orders and complete customer satisfaction. View More

We are committed to ensuring your complete satisfaction with every purchase. We understand that circumstances may arise where you must return a product or request a refund. If for any reason you are not satisfied, you may return the item(s) according to the terms outlined below. View More

This Payment Policy outlines the terms and conditions governing all payments made for products purchased through our website. By making a purchase, you agree to be bound by this Payment Policy. View More

Installation Steps

Step1: Turn off the oven gas and electricity.

Step2: Remove the oven front panel to access thermostat components.

Step3: Replace the old thermostat with the new kit, following alignment guides.

Step4: Reconnect all wiring and the sensing bulb.

Step5: Secure panels back in place.

Step6: Test oven cycles for correct temperature response.