Garland 1028297 Pilot Assembly Natural Gas

Special Price $29.55 Regular Price $58.65
In stock
SKU
1028297
Manufacturer:
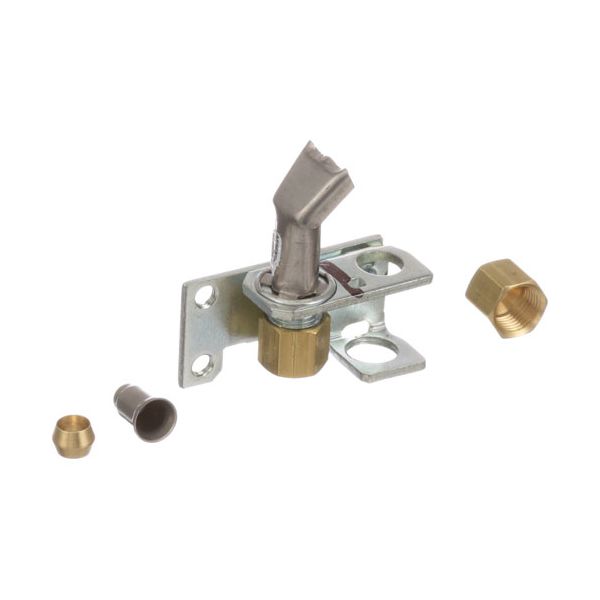
The Garland 1028297 Pilot Assembly Natural Gas is made to provide a continuous source of flame which triggers the main burner when the appliance is turned on. It works by passing the natural gas through its assembly whereby it combines with air to generate a controlled pilot flame to ensure a stable ignition performance. This assembly is actually installed in the compatible Garland cooking equipment, which is usually close to the burner area to make sure that the primary gas flow is ignited correctly and that the unit operates as intended.

Dimensions

  • Length: 2 In
  • Width: 2 In
  • Height: 0.75 In
  • Weight: 0.2 lbs
https://partsfe.com/media/catalog/product/g/a/garland-1028297-nat-lp-oven-pilot-13633-2.jpg

Product Notes

  • Nat/Lp Pilot, Factory # 2Ch-10, 1830-115, 1830-500,
  • Tube Size 3/16" & 1/4", Flame Pattern Right
  • Garland Oven Series: Bco, Eco, G48P, G2000, Ico.
  • Southbend Oven 321D After 1982 (1982 & Prior Use Oem #
  • 1164282).Series: 136 & 142 W/Suffix C Or D But W/O Co
  • Prefix, 300 W/F Suffix.
  • Us Range Oven Series: Performer Ii (Right Side) W/Standing
  • Pilot.(Units W/Electronic Pilot Use M-214)
  • Vulcan Hart Oven 260L-77R, 319A-77R, 399A-77R, Series: Eg,
  • Vg.Sg-60L-77R, Sg-260L-77R.24L, 48L, 481L/Lc, 148L/Lc,
  • 36L/Lc, 60L/Lc/Lcc 160L/Lc, 260L/Lc/Lcc
  • Wolf Model?
Write Your Own Review
You're reviewing:Garland 1028297 Pilot Assembly Natural Gas
Your Rating
Customer Questions
What maintenance is required for the Garland 1028297 Pilot Assembly?

Regularly inspect and clean the pilot assembly to remove debris and carbon deposits that may affect ignition. Ensure gas connections remain tight and free of leaks. regular checks can maintain steady flame performance and better gas operation.

What are common issues with the Garland 1028297 Pilot Assembly?

  • Pilot light failing to ignite.
  • Weak or inconsistent flame.
  • Gas flow restriction due to clogging.
  • Thermocouple sensing failures
  • Flame extinguishing during use

We strive to provide our customers with a hassle-free and efficient shopping experience. Our shipping policy ensures the timely delivery of your orders and complete customer satisfaction. View More

We are committed to ensuring your complete satisfaction with every purchase. We understand that circumstances may arise where you must return a product or request a refund. If for any reason you are not satisfied, you may return the item(s) according to the terms outlined below. View More

This Payment Policy outlines the terms and conditions governing all payments made for products purchased through our website. By making a purchase, you agree to be bound by this Payment Policy. View More

Installation Steps

Step1: Turn off main gas supply and disconnect electrical power.

Step2: Remove access panel and detach old pilot assembly carefully.

Step3: Clean mounting area thoroughly and inspect gas line for damage.

Step4: Position new pilot assembly securely in correct orientation.

Step5: Connect gas line and thermocouple per manufacturer specifications.

Step6: Tighten fittings, ensure proper alignment and stability.

Step7: Restore gas, test ignition, and check carefully for leaks.