Wells 506273 Warmer Element 240V 825W 6" DIA

Special Price $60.36 Regular Price $108.82
In stock
SKU
506273
Manufacturer:
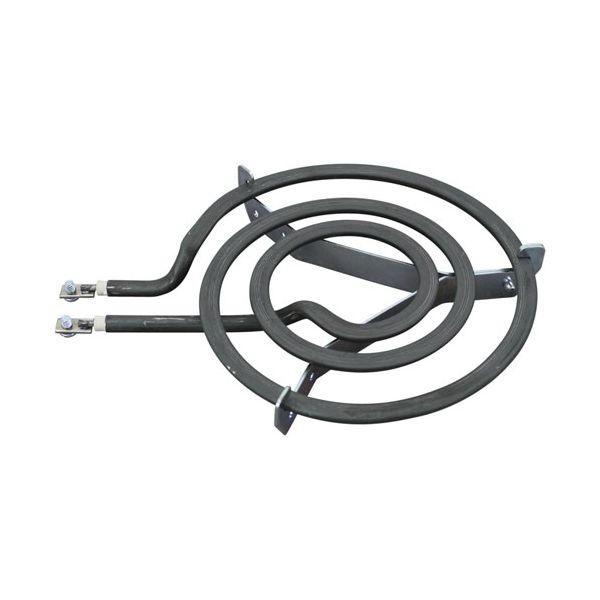
Wells 506273 Warmer Element is a 240V, 825W heater that is used to warm up food warmers such as models SS8T, SS10T, SW8, and SW10. It measures 6 inches in diameter and is able to transfer the heat needed in warming foods to be served. This element works at single phase 240 VAC power supply and requires terminal connections with flag terminals and screws # 26-2899, 8-32 X 1/4” SS. The Wells Warmer Element is robust, quick and easy to fit, and ensures a steady heat output.

Dimensions

  • Length: 8 In
  • Width: 5.5 In
  • Height: 1 In
  • Weight: 0.3 lbs
https://partsfe.com/media/catalog/product/w/e/wells-506273-warmer-element-240v-825w-6-dia-17101-2.jpg

Product Notes

  • Element, [ 240V 825W 1Ph ] [ 6" Dia. ]
  • [Terminals {Flag W/Screw }, [8-32],
  • Includes Screws # 26-2899, 8-32 X 1/4" Ss
  • Wells Food Warmer Ss8T, Ss10T, Sw8, Sw10
BLOOMFIELD:
Write Your Own Review
You're reviewing:Wells 506273 Warmer Element 240V 825W 6" DIA
Your Rating
Customer Questions
What is the Best Electric Griddle?

Electric Griddle is an electronic equipment that uses an electric element as its heat source. It has a large cooking surface often made up of nonstick material. Electric Griddle has a surface which you do not find in the regular stovetop cookware. ...

What maintenance is required for the Wells 506273 Element?

Inspect the element for dirt, debris, or corrosion. Clean gently and ensure electrical connections are tight. Disconnect power before maintenance. Regular checks maintain even warming and stable operation.

What are the common issues with the Wells 506273 Element?

  • Element not heating properly.
  • Hot spots are causing uneven warming.
  • Loose or corroded wiring.
  • Element burnout.

We strive to provide our customers with a hassle-free and efficient shopping experience. Our shipping policy ensures the timely delivery of your orders and complete customer satisfaction. View More

We are committed to ensuring your complete satisfaction with every purchase. We understand that circumstances may arise where you must return a product or request a refund. If for any reason you are not satisfied, you may return the item(s) according to the terms outlined below. View More

This Payment Policy outlines the terms and conditions governing all payments made for products purchased through our website. By making a purchase, you agree to be bound by this Payment Policy. View More

Installation Steps

Step1: Power off and unplug the Warmer.

Step2: Remove the old element carefully to avoid damage.

Step3: Align the new element in the mounting slots.

Step4: Connect wires securely and fasten screws evenly.

Step5: Ensure no loose connections exist.

Step6: Restore power and verify proper operation before use.