Blodgett 8338 Oven Hinge Pin Assembly

Special Price $41.54 Regular Price $69.01
In stock
SKU
8338
Manufacturer:
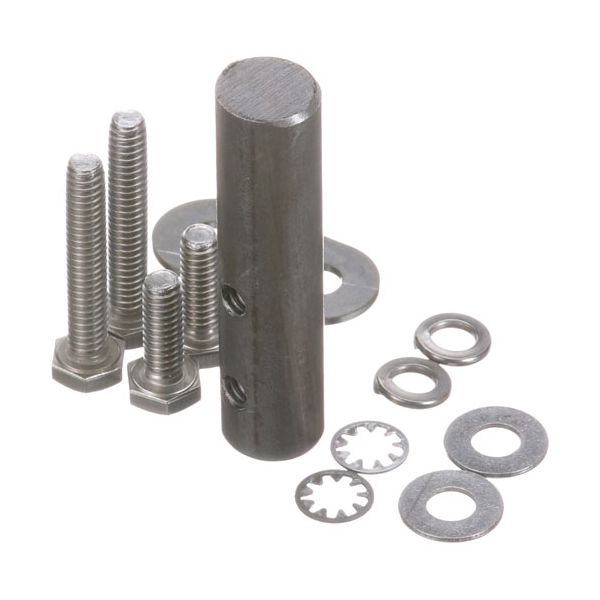
The Blodgett 8338 Oven Hinge Pin Assembly enables the oven door to swing on its pivot point without falling over. It fits in the hinge bracket and aids in the movement of the door. The pin is placed at point of the hinge on the frame of the oven. Its installation complies with the existing hinges, which make the door work. The assembly is in direct contact with the hinge mechanism, and it directs the swing of the door without any interference with other parts of the oven.

Dimensions

  • Length: 2.25 In
  • Width: 2.75 In
  • Height: 1 In
  • Weight: 0.318 lbs
https://partsfe.com/media/catalog/product/b/l/blodgett-8338-hinge-pin-77463-2.jpg

Product Notes

  • Hinge Pin Assembly
  • 2-11/16 X 5/8 W/ 2 Ea 1-1/2 X 1/4-20 Hex Bolts,
  • 2Ea Internal Star Washers, 2Ea3/4 X 1/4-20 Hex Bolts,
  • 2Ea 1/4 Flat Washer, 2Ea 1/4 Lock Washer
  • Blodgett Kco-25E, Ctb After 9/86
BLODGETT:
Write Your Own Review
You're reviewing:Blodgett 8338 Oven Hinge Pin Assembly
Your Rating
Customer Questions
What maintenance is required for the Blodgett 8338 Hinge Pin?

Keep the hinge pin clean and lightly lubricated to ensure smooth door movement. Inspect regularly for damage, bending, or corrosion and replace if needed. Proper maintenance prevents misalignment and ensures safe, consistent door operation.

What are common issues with the Blodgett 8338 Hinge Pin?

  • Loose hinge pin causing door sag.
  • Corrosion leading to stiffness or binding.
  • Wear resulting in misalignment and noise.
  • Stripped threads preventing secure fitting.
  • Pin seizure due to lack of lubrication.

We strive to provide our customers with a hassle-free and efficient shopping experience. Our shipping policy ensures the timely delivery of your orders and complete customer satisfaction. View More

We are committed to ensuring your complete satisfaction with every purchase. We understand that circumstances may arise where you must return a product or request a refund. If for any reason you are not satisfied, you may return the item(s) according to the terms outlined below. View More

This Payment Policy outlines the terms and conditions governing all payments made for products purchased through our website. By making a purchase, you agree to be bound by this Payment Policy. View More

Installation Steps

Step1: Turn off and cool the oven completely before starting.

Step2: Open the door and support its weight to prevent strain.

Step3: Remove the worn hinge pin using pliers if necessary.

Step4: Align the door hinge holes with the frame hinge bracket.

Step5: Insert the new hinge pin fully through aligned holes.

Step6: Ensure the pin sits flush and secures the hinge firmly.

Step7: Test the door for smooth opening and closing.