Star Mfg 2T-Z5958 Oven SA Thermostat 100°F-450°F

Special Price $208.73 Regular Price $294.82
In stock
SKU
2T-Z5958
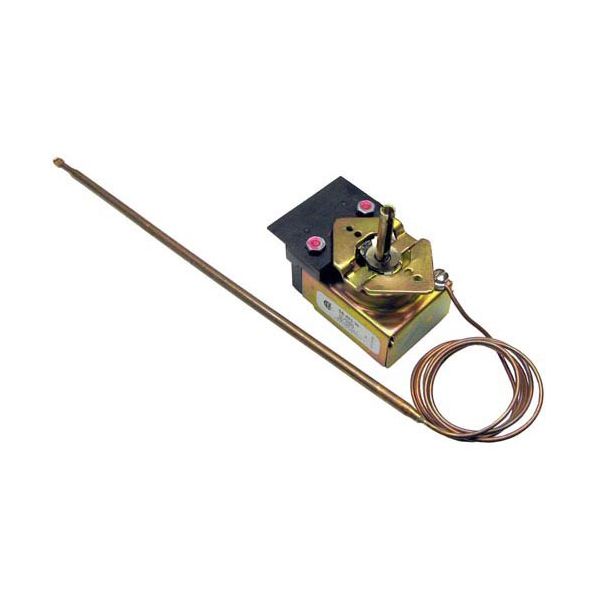
The Star Mfg 2T-Z5958 Thermostat is a system that measures the temperature of the griddle surface, and regulates the amount of heat being emitted to keep the temperature at the desired level. It reacts to variations in thermal conditions by its internal control system which maintains a uniform control within the 100°F to 450°F range. This thermostat is fitted in the control panel of the griddle, where it is directly linked to the heating components to control the level of temperature.

Dimensions

  • Length: 10.5 In
  • Width: 1.7 In
  • Height: 2.7 In
  • Weight: 0.6 lbs
https://partsfe.com/media/catalog/product/s/t/star-mfg-2t-z5958-oven-sa-thermostat-100-f-450-f-76618-2.jpg

Product Notes

  • Sa T'Stat, 100-450 F, Vert Bkt, .187" Flat Down, 36" Cap,
  • Bulb 3/16" X 9-3/4", Has Auxillary Switch,
  • Star Grill Elec: 515(Tga), 524(Chsa, Chsd, Tga, Tgd,
  • Tgds ), 536(Chsa, Chsd, Tga Tgd ), 548(Chsa, Chsd, Tga, Tgd
  • Tgds ).
  • Knob # 22-1420 Pointer Knob For Tgd
  • Black T'Stat Indicator Knob W/ Red Line, "Star"
  • Flat Right.
  • Knob # 22-1169 Off-450-150 F, For Tg, Tgs
  • [ 2-1/2" Dia ] [ Off-450-150] (Flat Right)
STAR MFG:
STERO:
STA2T-Z5958, STAZ5958
Write Your Own Review
You're reviewing:Star Mfg 2T-Z5958 Oven SA Thermostat 100°F-450°F
Your Rating
Customer Questions
What maintenance is required for the Star Mfg 2T-Z5958 SA Thermostat?

Regularly inspect the thermostat for accurate temperature control and ensure the sensing bulb is securely positioned inside the oven. Check wiring and connections for looseness, corrosion, or damage that may affect performance. Test temperature calibration periodically to confirm proper operation within the 100°F–450°F range. Always disconnect power before servicing to prevent electrical hazards.

What are common issues with the Star Mfg 2T-Z5958 SA Thermostat?

  • Inaccurate temperature control.
  • Failure to reach set temperatures.
  • Sensor or wiring damage.
  • Intermittent oven cycling or shutdown.

We strive to provide our customers with a hassle-free and efficient shopping experience. Our shipping policy ensures the timely delivery of your orders and complete customer satisfaction. View More

We are committed to ensuring your complete satisfaction with every purchase. We understand that circumstances may arise where you must return a product or request a refund. If for any reason you are not satisfied, you may return the item(s) according to the terms outlined below. View More

This Payment Policy outlines the terms and conditions governing all payments made for products purchased through our website. By making a purchase, you agree to be bound by this Payment Policy. View More

Installation Steps

Step1: Disconnect power to the oven.

Step2: Remove the control panel to access the thermostat.

Step3: Disconnect wiring and remove the capillary bulb from its bracket.

Step4: Unfasten mounting hardware and remove the thermostat.

Step5: Install the new thermostat, secure the sensing bulb, reconnect wiring, and test temperature calibration.