
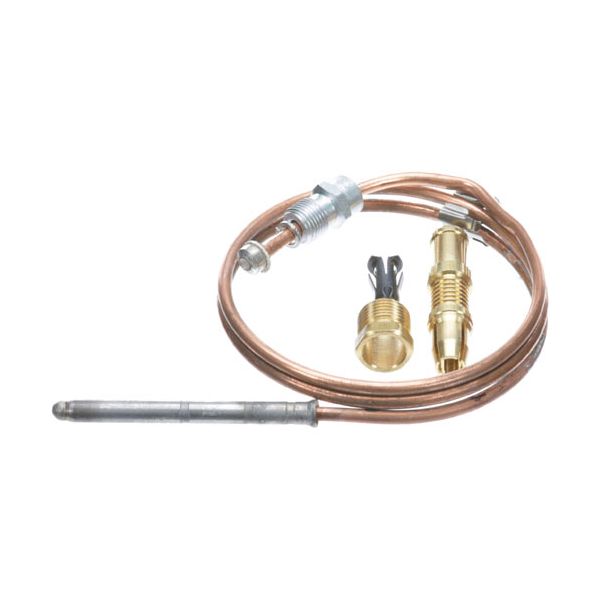
Dean 1149 24" Thermocouple

Special Price $19.25 Regular Price $25.00
In stock
SKU
1149
Manufacturer:

The Dean 1149 24" Thermocouple is a temperature sensor safety element that is applied in gas-fired commercial cooking systems. It is placed close to the pilot flame in order to sense the heat and produce electrical signal that keeps gas valve open during operation. This thermocouple is usually applied in fryers and other gas appliances where the flame needs to be continuously monitored. When the pilot flame is lost, the signal will be terminated and the gas flow will be cut off. The component is essential in the ignition and the system.

Dimensions

  • Length: 5 In
  • Width: 4 In
  • Height: 0.5 In
  • Weight: 0.2 lbs
https://partsfe.com/media/catalog/product/d/e/dean-1149-1980-series-snap-fit-24-thermocouple-20-30-mv-89387-2.jpg

Product Notes

  • 1980 Series Snap Fit 24" Thermocouple, 20-30 Mv
  • Coaxial Thermocouple Threads = 11/32"-32
  • Anets Grill Ss2436.
  • Dean Fryer Where Applicable
  • Dynamic Cooking Systems Oven Where Applicable.
  • Garland Broiler Model?
ANETS:
DUKE:
DYNAMIC COOKING SYSTEMS:
JADE RANGE:
KEATING:
4485, KEA4485, KEAP15239L, P15239L
METAL MASTERS:
PITCO:
STAR MFG:
STERO:
STA2J-Z4609, STAZ4609
Write Your Own Review
You're reviewing:Dean 1149 24" Thermocouple
Your Rating
Customer Questions
What maintenance is required for the Dean 1149 Thermocouple?

Inspect the thermocouple regularly for corrosion, loose fittings, or burnt probe tips. Ensure it is securely mounted in the proper flame or heat zone for accurate readings. Clean gently to remove carbon buildup and verify wiring connections are tight and free from heat damage.

What are common issues with the Dean 1149 Thermocouple?

  • Weak or inconsistent millivolt output.
  • Faulty temperature readings.
  • Broken or corroded probe tip.
  • Loose or damaged connections.
  • Failure to signal gas valve correctly.
  • Intermittent heating shutdowns.
  • Carbon buildup affecting sensing accuracy.

We strive to provide our customers with a hassle-free and efficient shopping experience. Our shipping policy ensures the timely delivery of your orders and complete customer satisfaction. View More

We are committed to ensuring your complete satisfaction with every purchase. We understand that circumstances may arise where you must return a product or request a refund. If for any reason you are not satisfied, you may return the item(s) according to the terms outlined below. View More

This Payment Policy outlines the terms and conditions governing all payments made for products purchased through our website. By making a purchase, you agree to be bound by this Payment Policy. View More

Installation Steps

Step1: Turn off gas supply and shut down fryer completely for safety.

Step2: Allow unit to cool before servicing hot components.

Step3: Remove burner access panel to reach thermocouple assembly.

Step4: Disconnect old thermocouple from pilot bracket and gas valve.

Step5: Snap-fit new thermocouple into pilot bracket securely.

Step6: Connect lead to gas control valve, ensuring tight fit.

Step7: Restore gas and test pilot flame for stable output.