
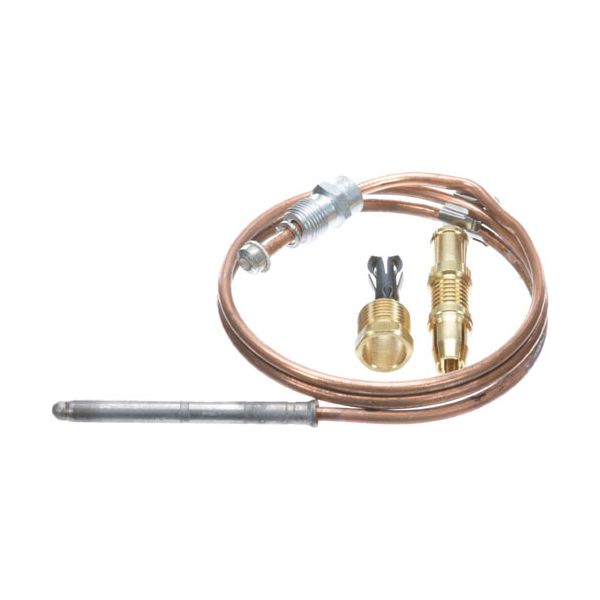
Vulcan Hart VH920040 24" Thermocouple

Special Price $19.25 Regular Price $25.00
In stock
SKU
VH920040
The Vulcan Hart VH920040 24" Thermocouple is a flame detector safety system that is part of a commercial gas cooking system. It is mounted near the pilot burner, and as it is exposed to heat, a millivolt signal is generated which is used to keep the gas valve open in normal operation. This is a thermocouple which is commonly used in ovens, ranges, and griddles in the professional kitchen setting. The signal is lost when the pilot flame is extinguished and the flow of gas is automatically turned off to avoid conditions.

Dimensions

  • Length: 5 In
  • Width: 4 In
  • Height: 0.5 In
  • Weight: 0.2 lbs
https://partsfe.com/media/catalog/product/v/u/vulcan-hart-vh920040-1980-series-snap-fit-24-thermocouple-20-30-mv-28849.jpg

Product Notes

  • 1980 Series Snap Fit 24" Thermocouple, 20-30 Mv
  • Coaxial Thermocouple Threads = 11/32"-32
  • Anets Grill Ss2436.
  • Dean Fryer Where Applicable
  • Dynamic Cooking Systems Oven Where Applicable.
  • Garland Broiler Model?
ANETS:
DUKE:
DYNAMIC COOKING SYSTEMS:
JADE RANGE:
KEATING:
4485, KEA4485, KEAP15239L, P15239L
METAL MASTERS:
PITCO:
STAR MFG:
STERO:
STA2J-Z4609, STAZ4609
Write Your Own Review
You're reviewing:Vulcan Hart VH920040 24" Thermocouple
Your Rating
Customer Questions
What maintenance is required for the Vulcan Hart VH920040 Thermocouple?

Regularly inspect the thermocouple for soot buildup, corrosion, or loose connections that may affect flame sensing performance. Keep the pilot assembly area clean and ensure the thermocouple remains properly positioned within the pilot flame. Check wiring and mounting points for signs of wear or damage.

What are common issues with the Vulcan Hart VH920040 Thermocouple?

  • Weak or no flame detection signal.
  • Pilot flame failure or shutdown issues.
  • Corroded or damaged sensing tip.
  • Loose or faulty wiring connections.
  • Intermittent safety cut-off operation.

We strive to provide our customers with a hassle-free and efficient shopping experience. Our shipping policy ensures the timely delivery of your orders and complete customer satisfaction. View More

We are committed to ensuring your complete satisfaction with every purchase. We understand that circumstances may arise where you must return a product or request a refund. If for any reason you are not satisfied, you may return the item(s) according to the terms outlined below. View More

This Payment Policy outlines the terms and conditions governing all payments made for products purchased through our website. By making a purchase, you agree to be bound by this Payment Policy. View More

Installation Steps

Step1: Turn off gas and electrical supply; let appliance cool completely before starting.

Step2: Access burner assembly, then carefully remove old thermocouple.

Step3: Position new thermocouple at pilot flame and secure mounting bracket firmly.

Step4: Connect lead to gas valve terminal and tighten connections securely.

Step5: Restore gas and power, light pilot, verify stable flame, and check for leaks.
