Royal Range 2209 Oven Pilot Assembly Natural gas Spark Igniter

Special Price $48.51 Regular Price $77.00
In stock
SKU
2209
Manufacturer:
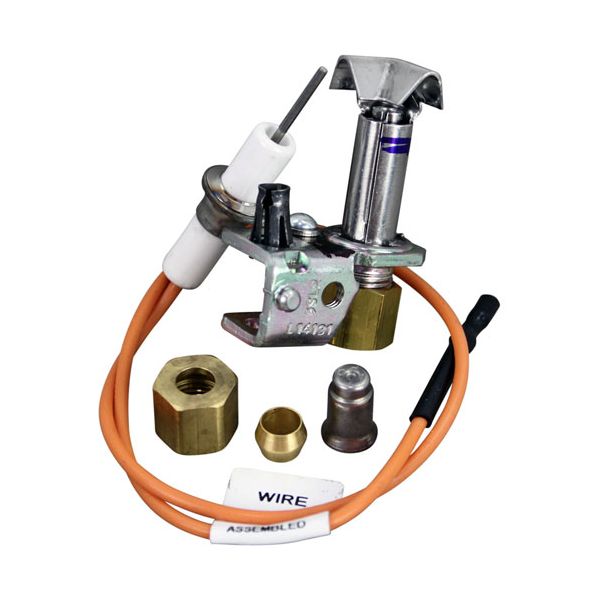
The Royal Range 2209 Igniter/Pilot Assembly Natural Gas operates by supplying a starting source of flame which triggers the main burner as the oven starts its heating cycle. It works by forcing the gas to the pilot region where the igniter creates and sustains a steady flame to continue burning the burner throughout the operation. This assembly is placed within the oven close to the burner compartment and is attached to gas supply line and positioned to come in direct contact with the main burner to provide uniform ignition.

Dimensions

  • Length: 2.5 In
  • Width: 1.5 In
  • Height: 3.5 In
  • Weight: 0.2 lbs
https://partsfe.com/media/catalog/product/r/o/royal-range-2209-oven-pilot-assembly-natural-gas-spark-igniter-94338-2.jpg

Product Notes

  • Spark Ign Oven Pilot Nat, Igniter W/12" Wire W/ Round
  • Push On End, 3/16" Cct Nut & Sleeve, Orifice Is .18" Nat
  • Includes Lp Orifice # 26-1554
  • Includes Nat Orifice # 26-1555
  • Use Spark Ignition Module "Sm2", # 44-1009
  • American Range Oven Model?
  • Dynamic Cooking Systems
  • Oven Range - Oven Section.
  • Imperial
  • Oven Series: Ir W/Convection Oven.
AMERICAN RANGE:
10413, A11104, A11132, A11301, AMR10413, AMRA11104
IMPERIAL:
1119, 1120, 1120LP, 1120NAT, IMP1119, IMP1120, IMP1120LP, IMP1120NAT
ROYAL RANGE:
Write Your Own Review
You're reviewing:Royal Range 2209 Oven Pilot Assembly Natural gas Spark Igniter
Your Rating
Customer Questions
What maintenance is required for the Royal Range 2209 Pilot Assembly?

Periodically inspect the pilot assembly for dirt, grease, or soot buildup. Clean the orifice and surrounding components carefully to ensure proper ignition. Check connections and alignment, and replace any worn parts to maintain secure and accurate oven operation.

What are the common issues with the Royal Range 2209 Pilot Assembly?

  • Difficulty igniting or staying lit.
  • Weak or uneven flame.
  • Clogged, dirty orifice.
  • Loose or misaligned components.

We strive to provide our customers with a hassle-free and efficient shopping experience. Our shipping policy ensures the timely delivery of your orders and complete customer satisfaction. View More

We are committed to ensuring your complete satisfaction with every purchase. We understand that circumstances may arise where you must return a product or request a refund. If for any reason you are not satisfied, you may return the item(s) according to the terms outlined below. View More

This Payment Policy outlines the terms and conditions governing all payments made for products purchased through our website. By making a purchase, you agree to be bound by this Payment Policy. View More

Installation Steps

Step1: Turn off the gas supply completely and ensure the oven is fully cool.

Step2: Carefully remove the old pilot assembly, noting orientation and tubing placement.

Step3: Mount the new pilot assembly, ensuring all connections are properly aligned.

Step4: Tighten fittings securely and check for leaks using soapy water.

Step5: Ignite the pilot and test for correct operation before using the oven normally.