The store will not work correctly in the case when cookies are disabled.
We collect user information to provide a better user experience and protect the security of our website. By continuing to use our website, you acknowledge the use of cookies.
Jackson Dishwasher Troubleshooting: Here’s How to Fix Common Issues
Jackson Dishwasher Troubleshooting: Here’s How to Fix Common Issues
Posted:April 01, 2025
Are you tired of dealing with dishwashing woes in your commercial restaurant kitchen? Introducing the Jackson Dishwasher Troubleshooting Guide – your go-to resource for seamless operations. In a bustling restaurant environment, a properly functioning dishwasher is more than just a convenience; it's essential for maintaining hygiene standards and ensuring smooth service.
Jackson dishwashers, renowned for their durability and efficiency, are trusted fixtures in countless kitchens worldwide. However, even the most reliable equipment can encounter issues. That's where this guide steps in, offering concise solutions to common problems like why won't my dishwasher turn on.
Understanding your Jackson commercial dishwasher parts involves familiarizing yourself with its parts and their roles in ensuring efficient operation. The dishwasher comprises several key elements, including the water inlet valve, detergent dispenser, wash pump, spray arms, heating element, and drainage system.
The water inlet valve regulates the flow of water into the dishwasher, while the detergent dispenser releases soap at the appropriate stage. The wash pump circulates water throughout the dishwasher, aided by the spray arms, which distribute water and detergent evenly across dishes. The heating element elevates water temperature for effective cleaning and sanitization. Finally, the drainage system efficiently removes used water from the dishwasher, maintaining cleanliness and preventing clogs. Understanding how each Jackson dishwasher parts functions enables users to operate the Jackson dishwasher effectively, ensuring sparkling clean dishes with every use.
PartsFe offers a comprehensive selection of commercial dishwasher partsfrom renowned manufacturers such as Jackson, Hobart, and many more. Whether you need replacement wash arms, drain valves, or temperature gauges, we have you covered. With top-quality parts and fast shipping, you can trust PartsFe to keep your dishwasher running smoothly. Browse our extensive inventory today and find the exact parts you need for your commercial kitchen equipment.
Before we delve into the common issues have a look at this:
Common issues and Jackson dishwasher troubleshooting steps
Whether you run a restaurant or cafeteria, maintaining clean dishes and tableware is essential. Jackson Warewashing Systems produces a diverse range of commercial dishwashing equipment widely used in the foodservice industry. In the rare event that your machine encounters an issue, we're here to offer quick troubleshooting tips. Have a look at the commercial dishwasher buying guide before delving & finding the troubleshooting steps.
Below, you'll find Jackson dishwasher troubleshooting advice tailored to popular conveyor, door-type, and flight-type machines.
Machine not operating:
If your Jackson dishwasher fails to operate, it could be due to several reasons. Here are some troubleshooting steps to identify and resolve the dishwasher not working issue:
Check for unplugged power cord: Ensure the power cord is securely plugged into the electrical outlet.
Inspect for Damaged or disconnected power cord: Examine the power cord for any signs of damage and ensure it is properly connected at the terminal block. This issue should be addressed by an authorized technician.
Reset tripped circuit breaker: If the dishwasher keeps tripping, attempt to reset the circuit breaker. If the problem persists, consult an electrician to verify that the machine's amp draw and breaker size are appropriate.
Machine won’t fill:
If your dishwasher won't fill with water, it could be due to several reasons. Follow these steps to identify and resolve the issue:
Rinse/fill light off:
Check for open doors: Ensure that the dishwasher door(s) are securely closed. If they're ajar, firmly seal them shut to allow proper operation.
Inspect door switch: A malfunctioning door switch may prevent the dishwasher from filling. Contact an authorized technician to examine the switch wiring or replace it if necessary.
Examine cam timer and microswitch: Issues with the cam timer or its microswitch can impede the filling process. Have a qualified technician inspect the timer wiring or replace the fill microswitch as needed.
Rinse/fill light on:
Clear water line obstructions: Check for any blockages in the water line and clean them out to ensure smooth water flow.
Verify water supply: Ensure that the dishwasher is properly connected to the water supply, and check that the valves are open. If your facility's water pressure is below 20 PSI, adjust it to the correct level.
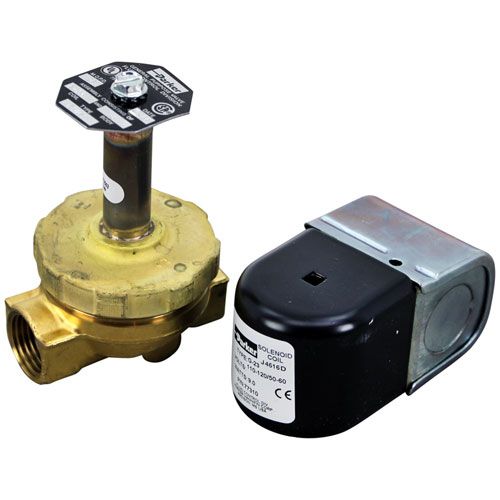
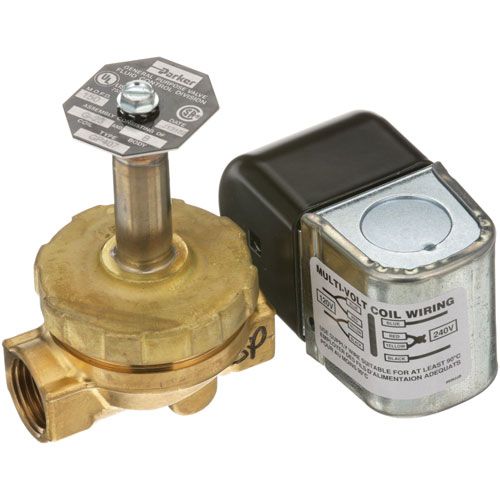
Inspect rinse solenoid valve: Contact an authorized technician to examine the solenoid valve wiring. Replacement of the coil or valve may be necessary.
Power indicator light off:
Reset Breakers: If the power indicator light is off, check for tripped circuit breakers or service breakers. Reset them, and if they continue to trip, consult an electrician to verify the machine's electrical load and breaker size.
Check Wiring: Have an electrician inspect the wiring from the dishwasher to the power source to ensure correct connections.
Power indicator light on:
Confirm Water Supply: Check if the water lines are properly connected to the dishmachine to ensure a sufficient water supply.
Ensure Doors are Closed: Just as in the Rinse/Fill Light Off scenario, make sure the dishwasher door(s) are securely closed.
Inspect Water Solenoid Valve: Contact an authorized technician to examine the solenoid valve. Replacement of the coil or valve may be required.
By following these steps, you can troubleshoot and resolve issues with your dishwasher's filling mechanism, ensuring optimal performance. If problems persist, seek assistance from qualified professionals.
Machine fills too much:
Is your Jackson dishwasher filling up with too much water? This issue can stem from various sources, but fear not, as we've compiled a comprehensive troubleshooting guide to help you diagnose and resolve the problem.
Fill cam adjustment needed: The fill cam requires adjustment by an authorized technician to rectify the excess water filling.
Faulty rinse solenoid valve: Arrange for an authorized technician to inspect the wiring of the solenoid valve. Replacement of the coil or valve may be necessary.
High water pressure: Check if the water flow pressure at your facility is within the range of 20 +/- 5 PSI. If it exceeds this range, make necessary adjustments.
Machine keeps filling & won’t stop:
Verify water supply: Ensure that the water lines are properly connected to the dishmachine to address the lack of water supply.
Close drain valves: Check if the drain valves are open and close them if required to resolve the issue.
Inspect water level controls: Arrange for an authorized technician to examine the wiring of the water level controls and replace them if found faulty.
Check for tub leak: Investigate for any holes or cracks underneath the machine that could indicate a leak in the tub.
Adjust level control sensors: An authorized technician may need to adjust the sensitivity settings on the level control sensors to rectify the problem.
Machine fills slowly or rinses weakly:
Low incoming water pressure: Ensure that the flow pressure in your facility is within the range of 20 +/- 5 PSI. Adjust if it falls below this threshold.
Obstruction in water line: Check for any clogs in the water line and clear them out.
Blocked rinse tube plate: Inspect the rinse tube plate for any blockages. If present, clean them out to restore proper flow.
Blocked rinse arms: Remove and clean the rinse arms according to the instructions provided in your owner’s manual.
Clogged incoming water solenoid: Examine the valve for any trapped debris and remove it as necessary.
Clogged Y-strainer: If the Y-strainer is obstructed, clean it thoroughly to ensure smooth water flow.
Water floods from the machine:
Malfunctioning drain valve: An authorized technician should inspect the wiring of the valve motor. If the wiring is correct and the issue persists, the technician will replace the valve.
High incoming water pressure: Check if the flow pressure in your facility falls within the range of 20 +/- 5 PSI. If it exceeds this range, make necessary adjustments.
Timer motor short circuit: If the timer motor shorts out during the rinse/fill cycle or has a faulty microswitch, an authorized technician will verify the operation of the timer and ensure proper wiring of the fill microswitch. If either component is defective, they will need replacement.
Poor spray pattern or low wash/pre wash arm pressure:
If your Jackson dishwasher not spraying water, then:
Blocked wash or pre wash arms: Examine the nozzles for any clogs caused by debris. Clean the debris if necessary.
Blocked wash or pre-wash tank/pump strainers: If there is a noticeable amount of debris, clean out the strainers to ensure proper flow.
Worn wash or pre wash impeller: If either impeller is worn out, arrange for an authorized technician to replace it.
Machine runs in wash cycle continuously:
Check for delime mode: Verify if the dishwasher machine is operating in delime mode.
Switch adjustment: Toggle the NORMAL/DELIME switch to the "NORMAL" setting.
Ensure proper function: Confirm that the dishmachine exits delime mode and operates normally.
Monitor performance: Observe if the dishmachine runs as expected in the regular wash cycle.
Door won’t stay closed:
If the dishwasher door slams shut and refuses to remain closed, it may indicate a broken spring or a bent hinge. Reach out to an authorized technician to assess and replace the faulty component, ensuring smooth operation of the door.
Water drains at the beginning of the cycle:
Drain valve stuck open: Should the drain valve remain stuck in the open position, it necessitates the attention of an authorized technician for repair or replacement.
Incorrectly installed drain valve: Improper installation of the drain valve can lead to water leakage from its connections. Contact an authorized technician to ensure proper tightening of the connections.
Damaged drain valve: If the drain valve is found to be damaged, it should be replaced by an authorized technician to restore proper functionality.
Low water temperature:
Insufficient incoming water temperature: Ensure the accuracy of the incoming water temperature by referencing the machine's data plate.
Faulty temperature gauge: If the temperature gauge is malfunctioning, it requires replacement by an authorized technician.
Malfunctioning rinse solenoid valve: Arrange for an authorized technician to inspect the wiring of the solenoid valve. Replacement of the coil or valve may be necessary.
Excessive lime or scale buildup: In the case of heavy lime or scale accumulation, the machine should undergo cleaning with a deliming solution to restore optimal performance.
Low wash tank level:
Low incoming water pressure: Verify that the flow pressure in your facility falls within the range of 20 +/- 5 PSI. Adjust as needed if the pressure is low.
Misaligned fill cam: Contact an authorized technician to adjust the fill cam accordingly.
Leaking drain valve: Inspect the drain hose for obstructions; if clear, the valve may not be sealed correctly and will require replacement by an authorized technician.
Uneven machine: Ensure the machine is level to prevent operational issues.
Misplaced curtain or splash shield runoffs: If applicable, check for misplacement of the curtain or splash shield runoffs and adjust as necessary for proper function.
Dishes are dirty:
Improper pre-scraping of wares: Ensure that dishes and wares are properly scrapped before being placed in the machine. Excessive food waste can disrupt the cleaning process.
Low incoming water pressure: Check if the flow pressure in your facility meets the recommended range of 20 +/- 5 PSI. Adjust as necessary to maintain optimal pressure.
Blocked rinse tube plate: Inspect the rinse tube plate for any blockages. If found, remove the obstructions to ensure smooth rinsing.
Incorrect chemical concentrations: Review the concentrations of the chemicals being used. Verify these concentrations and dispenser usage with your chemical representative to ensure effective cleaning.
Water leaks from the vacuum breaker:
Excessive lime or scale accumulation: In the case of heavy lime or scale buildup in the breaker, both the breaker plunger and seat require cleaning using a deliming solution.
Blocked vacuum breaker: An obstruction in the vacuum breaker might prevent it from seating properly, leading to operational issues.
Vacuum breaker plunger or distorted seat: For repair of either component, an authorized technician should address the issue using a vacuum breaker repair kit.
Excessive vapor near the machine:
Inactive exhaust fan and ventilation system: Ensure both the exhaust fan and the room’s ventilation system are activated.
Misaligned curtain: Verify if the curtain is improperly positioned and requires adjustment.
Excessive water temperature: Assess the water temperature in your facility to ensure it aligns with the settings specified on the machine’s data plate.
Preventive maintenance is key to ensuring that your Jackson dishwasher runs smoothly and lasts for years. Here are some essential tips to maintain your dishwasher:
Regularly Clean the Filter and Spray Arms: To prevent clogs and ensure optimal cleaning performance, regularly clean the filter and spray arms. Food debris, soap scum, and mineral buildup can accumulate over time, affecting the dishwasher's performance.
Check and Clean the Door Seal: Inspect the door seal regularly for signs of wear and tear. Clean it gently with a mild detergent and warm water to remove any food particles or soap scum. If the seal is damaged, replace it promptly to prevent leaks.
Run a Maintenance Cycle: Many Jackson dishwashers have a self-cleaning or maintenance cycle. Running this cycle regularly can help remove buildup and ensure that the dishwasher continues to operate at peak performance.
Inspect Hoses and Connections: Check the hoses and connections periodically to ensure that they are secure and free of cracks or leaks. This will help prevent water damage and improve the efficiency of your dishwasher.
Use the Right Detergent: Using the wrong type of detergent can lead to poor cleaning performance and damage to the dishwasher's components. Always use the manufacturer-recommended detergent for your Jackson dishwasher.
Jackson dishwasher maintenance tips
To maintain optimal performance of your Jackson dishwasher, follow these essential maintenance tips. Regularly clean the wash and rinse arms to prevent clogs caused by food debris. Check and clean the filters and strainers to ensure efficient water flow and to prevent blockages. Inspect the door gaskets for any signs of wear or damage, and replace them if necessary to prevent leaks. Regularly delime the machine to remove mineral deposits and scale buildup, which can affect performance. Lastly, schedule regular inspections by an authorized technician to address any potential issues before they escalate, ensuring your dishwasher operates smoothly and efficiently.
Troubleshooting issues with your Jackson dishwasher can be manageable with the right knowledge and approach. By following the steps outlined in this guide, you can effectively identify and resolve common problems such as low water pressure, faulty components, or improper operation. Regular maintenance and inspection are crucial for ensuring the longevity and efficiency of your dishwasher. Remember to consult with authorized technicians for complex repairs or issues beyond your expertise. With proper care and attention, your Jackson dishwasher will continue to provide reliable service for years to come.
FAQs
Why is my Jackson dishwasher producing a burning smell during operation?
A burning smell during operation in your Jackson dishwasher could indicate overheating due to a malfunctioning motor or wiring issue.
How do you drain a Jackson dishwasher?
To drain a Jackson dishwasher, locate the drain hose at the back of the machine and either place it in a sink or connect it to a drainage system.
How can I address excessive foam or suds in my Jackson dishwasher?
Excessive foam or suds in your Jackson dishwasher may be caused by using too much detergent. Try reducing the amount of detergent used or switching to a low-sudsing detergent formula.