How to Troubleshoot and Replace Commercial Fryer Thermocouples Like a Pro
The thermocouple in a commercial fryer plays a vital role in monitoring the pilot flame to maintain proper temperature control. When this component fails, it can lead to uneven cooking, unexpected shutdowns, or complete fryer failure, causing delays in the kitchen. Whether you’re a maintenance expert or managing kitchen operations, knowing how to diagnose and replace a faulty fryer thermocouple is essential for keeping your equipment running smoothly and safely. This guide will provide clear steps to help you quickly identify issues with the thermocouple and replace it effectively, ensuring your fryer performs reliably with minimal downtime.
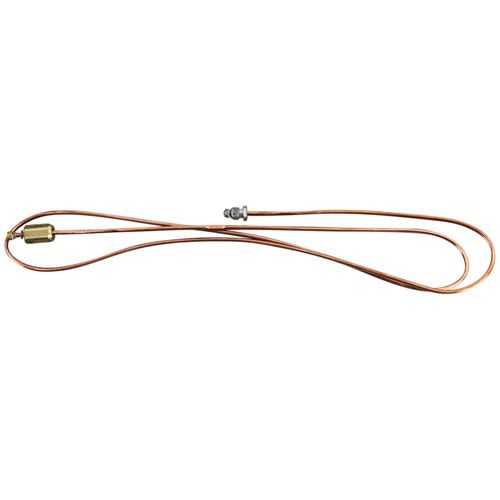
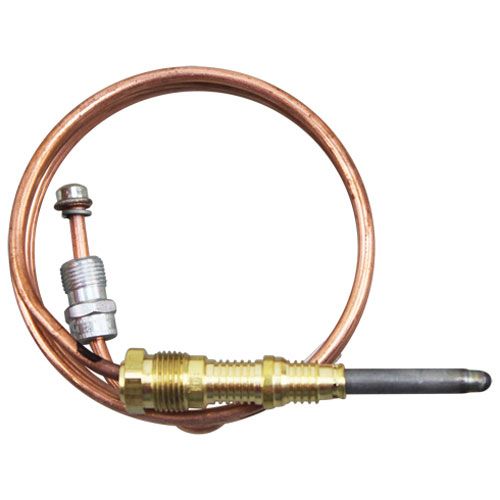
Understanding the Role of Fryer Thermocouple
Though small, thermocouples are vital parts of commercial gas fryers, ensuring they operate safely and efficiently. Here’s what makes them so important:
-
Monitors Pilot Flame: The thermocouple detects whether the pilot flame is burning, which is critical for the fryer’s temperature control.
-
Ensures Safety: When the pilot flame goes out, the thermocouple triggers the gas valve to close, preventing gas leaks and potential hazards.
-
Detects Flame Presence: It acts as a sensor that confirms the pilot light is on, enabling the main burner to operate safely.
-
Maintains Stable Cooking Temperature: By regulating gas flow based on flame detection, the thermocouple helps keep the fryer’s oil temperature consistent.
-
Protects Equipment: Proper thermocouple function helps avoid overheating and potential damage to fryer components by shutting off gas when necessary.
-
Improves Fuel Efficiency: It reduces unnecessary gas consumption by ensuring gas is only supplied when the pilot flame is lit.
Recognizing these functions underscores the importance of regularly checking and servicing thermocouples in commercial kitchens.
Looking for high-quality commercial fryer thermocouple parts? PartsFe offers essential components like thermocouples, gas valves, and pilot assemblies from trusted brands like Cecilware, Turbochef, and Antunes. Find the perfect parts for your fryer and keep your kitchen running smoothly!
Common Signs of a Faulty Fryer Thermocouple in Commercial Kitchens
A failing thermocouple for a fryer can cause malfunctions and disrupt kitchen workflow. Identifying these warning signs early helps avoid unexpected breakdowns and costly repairs.
-
Fryer Struggles to Stay Lit: The fryer’s flame frequently goes out or won’t remain ignited.
-
Temperature Inconsistencies: The oil temperature varies unpredictably or doesn’t reach or hold the proper heat level.
-
Gas Valve Fails to Open: The gas valve doesn’t activate when the fryer requires heat.
-
Error Messages on Controls: The fryer’s display shows faults related to flame sensing or temperature control.
-
Delayed Burner Ignition: There is a noticeable delay before the burner lights up when the fryer signals for heat.
-
Increased Gas Consumption: The fryer uses more gas than normal because the failing thermocouple causes irregular cycling of the gas valve.
Commercial Fryer Thermocouple Troubleshooting Steps
When fryer thermocouple troubleshooting is underway, it’s important to follow a methodical approach to identify and fix any problems affecting the fryer’s operation and safety. Here are the essential steps:
Pilot Light Won’t Stay Lit
Symptoms: The pilot light extinguishes immediately after releasing the control knob.
Possible Causes: A weak or misdirected pilot flame may not adequately heat the thermocouple.
Solutions:
-
Clean the Pilot Burner: Remove soot and debris using a wire brush or emery cloth.
-
Adjust Flame Size: Increase the pilot flame size by adjusting the pilot valve to ensure it properly heats the thermocouple.
-
Check Gas Pressure: Ensure the gas supply pressure is within the recommended range.
Inconsistent Heating or Delayed Recovery
Symptoms: The fryer takes longer than usual to reach the desired temperature, or the oil temperature fluctuates during cooking.
Possible Causes: Clogged burners or a malfunctioning thermostat can cause uneven heating.
Solutions:
-
Inspect Burners: Check for carbon buildup around burner ports and clean them with a stiff nylon brush.
-
Test Thermostat Calibration: Ensure the thermostat is calibrated correctly to maintain consistent oil temperatures.
Error Codes on Digital Displays
Symptoms: The fryer displays error codes such as E3 or F5, indicating ignition failures.
Possible Causes: Error codes like E3 or F5 often indicate ignition failures, which may be linked to thermocouple issues.
Solutions:
-
Relight the Pilot: Follow the manufacturer's instructions to relight the pilot flame.
-
Check Flame Sensors: Clean flame sensors with emery cloth to ensure proper detection.
-
Verify Gas Line Pressure: Use a manometer to check the gas line pressure and ensure it's within specifications.
Gas Valve Does Not Open
Symptoms: The fryer does not ignite, and the gas valve remains closed despite attempts to start.
Possible Causes: A faulty thermocouple may not generate sufficient voltage to signal the gas valve to open.
Solutions:
-
Measure Thermocouple Output: Use a multimeter to check the millivolt output. A healthy thermocouple typically produces 20-30 millivolts.
-
Replace Thermocouple: If the output is below the required range, replace the thermocouple.
Routine inspection and maintenance of the thermocouple helps avoid unexpected fryer failures and maintain safe kitchen operation.
How to Safely Remove a Faulty Thermocouple in Commercial Fryers
Malfunctioning fryer thermocouple replacement is crucial for the safe and efficient operation of your commercial fryer. Follow these steps to ensure a secure and proper replacement process.
Step 1: Power Down and Ensure Safety
Always switch off the fryer and shut off the gas supply before beginning any work. Let the fryer cool down completely to avoid burns or accidents.
Step 2: Perform a Visual Inspection
Examine the thermocouple carefully for any obvious signs of damage, such as cracks, corrosion, or soot buildup. These can indicate the need for replacement.
Step 3: Observe the Pilot Flame
Light the pilot flame and check if it fully surrounds the thermocouple tip. If the flame appears weak or uneven, clean the pilot assembly or adjust the gas flow to improve flame quality.
Step 4: Measure Thermocouple Output
Using a multimeter set to millivolts, disconnect the thermocouple from the gas valve and test its voltage output by heating the tip with a lighter. A healthy thermocouple typically produces 20-30 millivolts. Readings below this range suggest it may be defective.
Step 5: Check Wiring and Connections
Inspect all wiring leading from the thermocouple to the gas valve for loose connections, corrosion, or damage. Tighten fittings and clean contacts as needed to ensure proper electrical flow.
Step 6: Clean or Replace the Thermocouple
If the thermocouple is dirty, gently clean it with fine steel wool or an abrasive cloth. If cleaning doesn’t restore function or the voltage test fails, replace the thermocouple with the correct part.
Step 7: Verify Gas Valve Functionality
After confirming the thermocouple and wiring are in good condition, test whether the gas valve opens correctly when the pilot is lit. If the valve doesn’t operate properly, the problem may lie with the valve itself.
Step 8: Reassemble and Test the System
Reconnect all components securely, turn the gas supply back on, and ignite the fryer. Observe the pilot flame and heating behavior to ensure the issue has been resolved.
Check out this article on how to replace your deep fryer filter to keep your fryer running smoothly and maintain oil quality for better-tasting food.
Installing a New Fryer Thermocouple in Commercial Fryers Like a Pro
Proper installation of a thermocouple ensures optimal performance and longevity of your commercial fryer. Follow these expert steps to guarantee a secure and efficient setup:
Select the Appropriate Replacement Thermocouple
-
Ensure the replacement matches the original in length, model, and type (e.g., thermocouple or thermopile).
-
Verify compatibility with your specific fryer brand and gas valve model.
-
Confirm that the temperature rating and gas type (natural gas or LP) are appropriate.
-
Check that threads, fittings, and connectors align correctly.
Install the Thermocouple Probe
-
Position the probe tip so that the pilot flame fully envelops it.
-
Secure the probe using the provided bracket, ensuring it's firmly in place.
-
Tighten the compression fitting or nut by hand, then give a slight turn with a wrench—avoid overtightening to prevent thread damage.
Reconnect Wiring
-
Reattach wires exactly as they were before removal.
-
For certain models, ensure correct polarity.
-
Inspect connections for cleanliness, tightness, and corrosion.
Reassemble Safety Components
-
Reinstall any panels, guards, or covers.
-
Ensure nothing obstructs airflow or access to safety features.
Restore Gas and Power Supplies
-
Turn on the gas supply and open any necessary valves.
-
Reconnect power if applicable.
Test Pilot and Full Operation
-
Light the pilot and verify it remains lit when the control knob is released.
-
Use a multimeter to check the millivolt output, ensuring it falls within the expected range.
-
Bring the fryer to operating temperature and confirm burners ignite properly.
-
Ensure safety switches function correctly and do not trip unnecessarily.
Calibrate if Necessary
-
Some fryers allow for thermostat or temperature probe calibration.
-
Use a high-quality thermometer to verify the set temperature matches the actual oil temperature.
By following these steps, you can ensure a professional installation of your deep fryer thermocouple, leading to enhanced safety and efficiency in your commercial kitchen operations.
Maintenance Tips to Extend Thermocouple Lifespan in Commercial Fryers
Maintaining your commercial fryer’s thermocouple is essential for optimal performance and longevity. Here are key practices to ensure its durability:
-
Regular Cleaning: Periodically clean the thermocouple with fine steel wool or a soft abrasive cloth to remove soot and carbon buildup. This ensures optimal heat transfer and prevents voltage drop.
-
Prevent Oil Contamination: Avoid allowing breading, marinades, or sauces to drop into the fryer. These particles can adhere to components, leading to corrosion and reduced efficiency.
-
Filter Oil Regularly: Implement a daily oil filtration routine to remove impurities. Using well-filtered oil reduces residue buildup and minimizes strain on the thermocouple.
-
Monitor Pilot Flame: Ensure the pilot flame fully envelops the thermocouple tip. A weak or misdirected flame can lead to insufficient heating, affecting performance.
-
Schedule Professional Inspections: Arrange for annual professional maintenance to check the thermocouple's integrity and overall fryer condition. Early detection of fryer thermocouple issues can prevent costly repairs.
By adhering to these maintenance practices, you can enhance the longevity and reliability of your fryer’s thermocouple, ensuring consistent cooking performance.
Check out this article on how to clean a commercial deep fryer to ensure optimal performance and prolong the life of your equipment.
Conclusion
In conclusion, effectively troubleshooting and replacing thermocouples in commercial fryers is vital for maintaining kitchen safety and efficiency. By systematically addressing issues such as pilot flame instability or burner ignition failures, and following proper replacement procedures, you can ensure the longevity and optimal performance of your fryer. Regular maintenance, including cleaning and timely replacement of faulty thermocouples, further extends the lifespan of your fryer and ensures consistent cooking performance. For complex issues or when in doubt, consulting a professional technician is always advisable to prevent potential hazards and costly repairs.
FAQs
How do I know if my fryer thermocouple is faulty?
Common signs include the fryer not heating properly, the pilot light going out frequently, burners failing to ignite, or error codes on digital displays.
Can I test a fryer thermocouple myself?
Yes, with a multimeter, you can test the fryer thermocouple’s millivolt output to check if it’s producing the correct voltage when heated. Low readings usually indicate a faulty thermocouple.
How often should I replace my commercial fryer thermocouple?
Replacement frequency depends on usage and maintenance, but generally, a thermocouple can last several years. Regular inspections help identify when replacement is necessary.
Can a dirty thermocouple cause frying issues?
Yes, buildup of soot or debris on the thermocouple tip can prevent it from sensing the flame correctly, causing heating problems.