
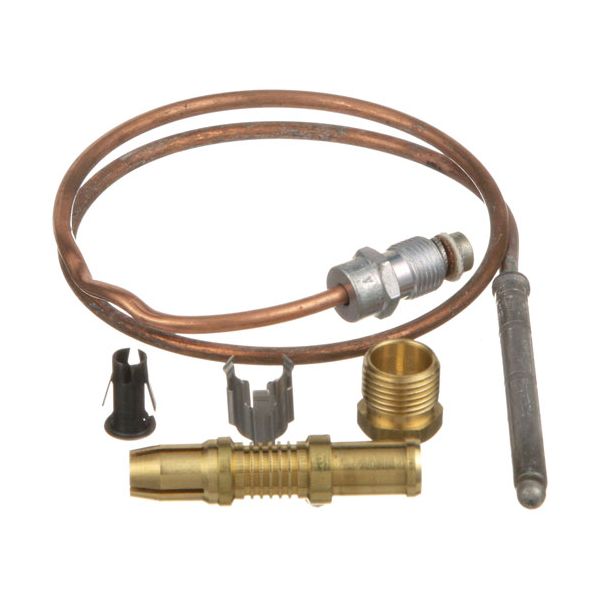
Star Mfg 2J-6726 Fryer Thermocouple 18" 20-30mV

Special Price $67.63 Regular Price $80.51
In stock
SKU
2J-6726
Manufacturer:

The Star Mfg 2J-6726 Fryer Thermocouple 18'' 20-30mV measures the burner flame by producing a signal when heated by the pilot flame. This signal is relayed to the gas safety system to verify that there is a presence so that gas can be sent through the system. The component is mounted close to the fryer pilot assembly, the sensing tip is in the flame path, and the lead is connected to the control connection. It has a standard fryer ignition system with an 18'' lead and a 20-30mV range of output.

Dimensions

  • Length: 5 In
  • Width: 4 In
  • Height: 0.5 In
  • Weight: 0.1 lbs
https://partsfe.com/media/catalog/product/s/t/star-mfg-2j-6726-1980-series-thermocouple-18-20-30mv-70428-2.jpg

Product Notes

  • 1980 Series Snap Fit 18" Thermocouple, 20-30 Mv
  • American Permanent Ware Griddle Ggm, Ggt
  • Comstock Castle Oven Bake, Barbeque & Pizza Ovens.
  • Series: C, D, F, K.
  • Dynamic Cooking Systems Oven All
  • Garland Broiler 6-40/50S, 7-40/50S, 8-40/50S, 60-40/50R
  • Oven Series: H281, P280. Standard Oven From 03/99 In
  • Canada Only, Range: G20-Sph
  • Imperial Model?
  • Star Fryer M14, Mi4 (D,Dl), M18, Mi8(D,Dl), M43, 215B, 216,
  • 403 404
  • Us Range Oven P-4-20.
  • Wolf Oven Ch, Chssd, R
AMERICAN RANGE:
10485, A11100, AMRA11100
ANETS:
ANEP8900-32, P8900-32
APW WYOTT:
CECILWARE:
COMSTOCK CASTLE:
DYNAMIC COOKING SYSTEMS:
IMPERIAL:
1121, 30030, IMP1121
ROYAL RANGE:
STAR MFG:
STERO:
STA2J-6726, STA2J6726, STA6726, STAH456
TRI-STAR:
310210, TRS310210
U-LINE:
1980-018
Write Your Own Review
You're reviewing:Star Mfg 2J-6726 Fryer Thermocouple 18" 20-30mV
Your Rating
Customer Questions
What maintenance is required for the Star Mfg 2J-6726 Thermocouple?

Regularly inspect the thermocouple for grease buildup, corrosion, or loose snap-fit connections. Clean the sensing tip to maintain accurate flame detection and voltage output. Ensure proper alignment with the pilot flame. Always shut off the gas supply before performing maintenance for safety.

What are common issues with the Star Mfg 2J-6726 Thermocouple?

  • Pilot light not staying lit consistently.
  • Weak or fluctuating millivolt output.
  • Improper positioning in pilot flame.
  • Loose or worn snap-fit connection.
  • Residue or corrosion affecting sensing performance.

We strive to provide our customers with a hassle-free and efficient shopping experience. Our shipping policy ensures the timely delivery of your orders and complete customer satisfaction. View More

We are committed to ensuring your complete satisfaction with every purchase. We understand that circumstances may arise where you must return a product or request a refund. If for any reason you are not satisfied, you may return the item(s) according to the terms outlined below. View More

This Payment Policy outlines the terms and conditions governing all payments made for products purchased through our website. By making a purchase, you agree to be bound by this Payment Policy. View More

Installation Steps

Step1: Shut off gas and electrical power and ensure the unit is fully cooled before work begins.

Step2: Remove the service panel to access the pilot assembly and existing thermocouple connection.

Step3: Disconnect the old thermocouple from the control valve terminal.

Step4: Install the new thermocouple, routing it to avoid kinks or heat exposure.

Step5: Place the sensing end directly in the pilot flame for proper millivolt generation.

Step6: Restore power and gas, then check stable ignition and consistent flame safety response.